
Trolling motor plugs are an essential item that every angler and boat owner should have. They are relatively inexpensive, easy to install, and the benefits of their existence are numerous.
In this article, we will discuss what a trolling motor plug is, how to install and wire a plug and socket combination and review some of our favorite trolling motor plugs on the market.
We will also look at a few quick-connect options for those anglers who cannot install the more traditional trolling motor plug and socket combination.
Note: most links in this article are Amazon.com Affiliate links, see Affiliate Disclosure, thank you.
What is a Trolling Motor Plug?
Trolling motor plugs are electrical plugs that are made water-resistant, amp rated, and easy to disconnect. Traditionally, plastics and metals that are corrosion resistant are used to construct trolling motor plugs.
What are the Benefits of Trolling Motor plugs?
Trolling motor plugs can have many benefits.
- The plug is a time saver allowing you quickly and easily to remove your motor from your boat.
- Trolling motor plugs protect electrical wires and connections.
- They eliminate the need for terminal blocks or additional connection points.
- Plugs allow you to disconnect power from you while not in use or charging.
A trolling motor plug is a time-saver, and it is ultra-convenient. It is convenient because the plug allows you to disconnect power from your trolling motor in one easy location rather than needing to remove the trolling motor cables from the trolling motor battery terminals themselves. This makes for easy removal when added with a quick disconnect trolling motor bracket.
Most plugs have terminal screws, or butt connectors, for a secure connection. Many of these terminals and screws are brass or other corrosion-resistant metals. A solid connection and dielectric grease can give you a reliable corrosion-resistant connection that will reduce maintenance time and increase fishing time.
Finally, most electric trolling motors recommended that you disconnect power while charging to protect the motor’s electronics. You can install a battery switch, which we recommend, but you don’t need to if you have a trolling motor plug. Simply unplug your motor before charging, and there will be no chance of your charger damaging your motor’s electronics.
You might find other benefits for your trolling motor plug, but the ones we have listed make a convincing argument for why you might want one on your boat.
Why would you need to disconnect your trolling motor?
There are several reasons for disconnecting your trolling motor and removing it from your fishing boat. The two main reasons are for maintenance and for winterizing your boat for storage.
The day will inevitably come when you will have to replace a part or component on your trolling motor. Or maybe you need to bring your trolling motor into a service center for routine warranty maintenance.
Instead of disconnecting all the wires individually from the power source and the trolling motor, a trolling motor plug lets you disconnect the motor from power in one easy location.
The same convenient trolling motor plug will be incredibly useful when you are winterizing your boat for storage. When you are storing your boat for winter, it is a good idea to remove all the batteries, electronic equipment, and anything that would be sensitive to long-term exposure to below-freezing temperatures.
Simply remove the trolling motor plug from its outlet, remove the motor itself, and last, the battery. Place the trolling motor, the deep-cycle marine battery or batteries, and the wires in a dry semi-temperature-controlled environment. A basement would be ideal. However, a garage that is not exposed to the elements would suffice as well. If in the garage, it is best to put the battery or batteries on a trickle charger.
Who is a Trolling Motor Plug For?
Because of the numerous safety benefits, the convenience factor, and how easy they are to install, trolling motor plugs should be for every boat and trolling motor owner.
Also, trolling motor plugs are relatively inexpensive as well. This makes trolling motor plugs accessible to anglers with every budget.
Since the cost is low, the installation is easy, and the benefits far outweigh the drawbacks, a trolling motor plug setup is a no-brainer.
However, it is not mandatory. If you live somewhere, you do not need to winterize your boat for storage and do not mind disconnecting the motor from the battery when the motor needs maintenance, and you will be fine without it.
How to Wire a Trolling Motor Plug
Installing a trolling motor electrical plug and socket is an easy process. Most anglers should be able to complete the task on their own. However, if you feel uncomfortable about any steps of the process, please seek professional assistance at your local service center.
Here is a quick list of some of the most common tools you will need before starting.
- Electric drill.
- 1-1/8″ drill bit.
- 7/64″ drill bit.
- Electrical wire.
- Wire stripper.
- Phillips screwdriver
- Trolling motor wiring kit, including the plug and socket.
Some trolling motor kits may require different size tools like drill bits.
Wiring the Trolling Motor Plug and Socket
- First, find a location on the boat for the electrical socket. Find a place that is mostly free from splash and water exposure.
- Drill into the sideboard of the boat with the 1 and 1/8th – inch drill bit.
- Place the socket into the newly drilled hole. You should be able to access the back of the socket once it is placed into the hole.
- Mark the places where the screw holes line up.
- Next, with the 7/64th-inch drill bit, drill the holes for the screws, then insert the screws with the Philips screwdriver. It should be completely secure to the sideboard.
- Now, you will want to remove ½-inch of the wire coating from the power cable that will be plugging into the socket.
- Also, remove wire coating from the wires that will be attaching to the battery terminals.
- Go ahead connect the red positive (+) and the black negative (-) to the matching red positive (+) and black negative (-) terminals on the battery, but don’t forget a breaker or fuse (*see note below).
- Then do the same thing and connect the red positive (+) and the black negative (-) wires to the back of the mounted socket.
- Next, take the power leads from the trolling motor and connect the red positive (+) and the black negative (-) to the corresponding locations on the back of the trolling motor plug.
- Once the trolling motor plus is attached, you are ready to put the plug into the socket. You should now have power successfully running from your battery to the trolling motor via the plug and socket.
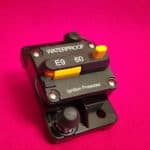
*Make sure to install the proper size amp fuse or circuit breaker onto the red positive (+) wire from your battery. It is a coastguard rule on large boats and best practice to position your fuse or breaker within 7 inches of the positive battery terminal.
Details/Notes of Different Plug Types
Now that we have discussed installing and wiring a trolling motor plug and socket into your boat, let us explore some of the best trolling motor plugs currently on the market. We have included a graphic wiring diagram and a summary of each plug’s features.
Check out our article for a more detailed review of Trolling Motor Plugs.
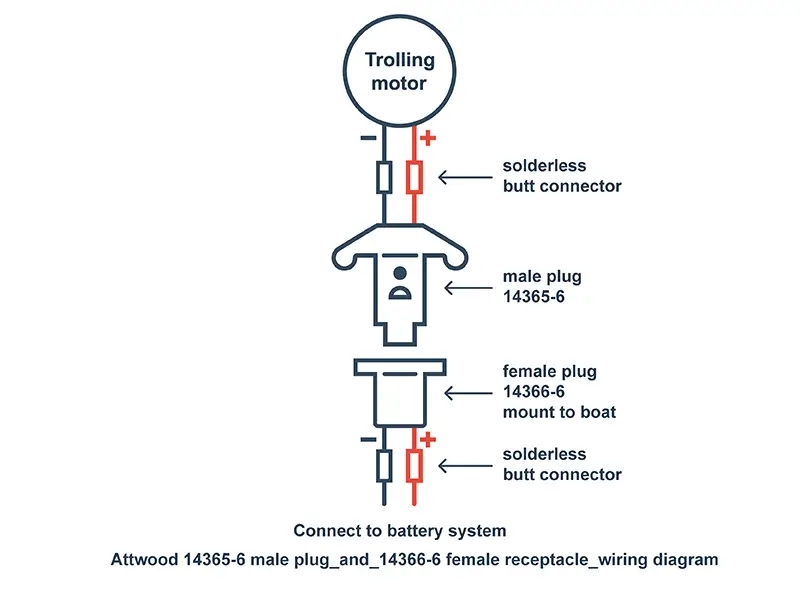
Attwood 14365-6

Attwood trolling motor plugs and sockets are known to be an excellent option for anglers that are on a budget. The key lock plug is a two-prong, two-wire plug and connector that are sold separately.
The 12-volt plug is rated at 60 amps and is compatible with a 24-volt system. The wire leads are only 6-inches long coming off the plug and the connector, so you will need to add some additional wire to add distance to reach the trolling motor and battery sufficiently.
Pros:
- 60-amp Rating.
- Line-up Key Markings for Correct Placement.
- Budget-Friendly.
Cons:
- Plug and Socket Sold Separately.
Click here to see on Amazon.com
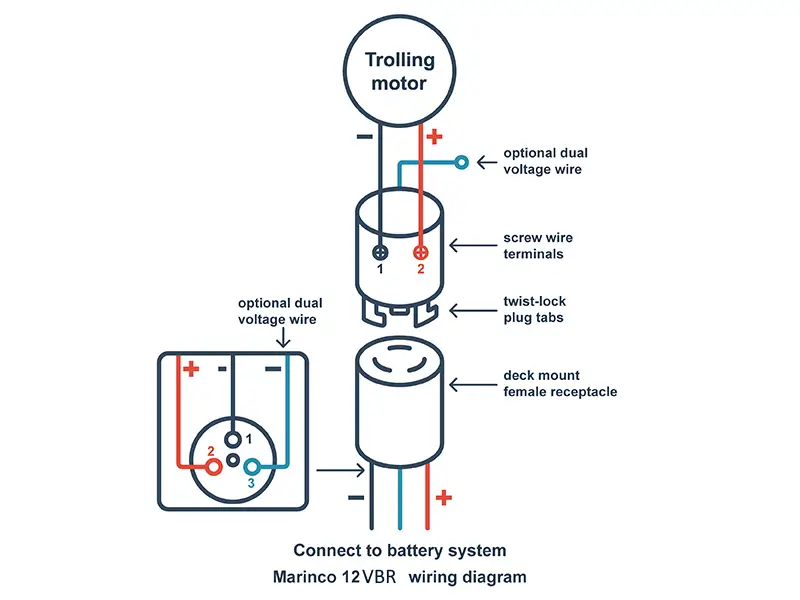
Marinco 12VBR & 12VBP

The Marinco 12VBR is a plated brass, corrosion-resistant three-tab twist and lock trolling motor plug. With three tabs, you can rest assured your trolling motor plug will stay secure in the socket at all times.
This plug has a voltage rating of up to 40 amps and works with either eight- or ten-gauge wire. There is also dual power if you would like to run additional devices.
The Marinco 12VBR is simple, easy to install, and is extremely secure. They are not rated for saltwater use, however.
Pros:
- Twist and Lock Plug for Secure Connection.
- Dual Power Available.
Cons:
- Not Rated for Saltwater.
Click here to see on Amazon.com
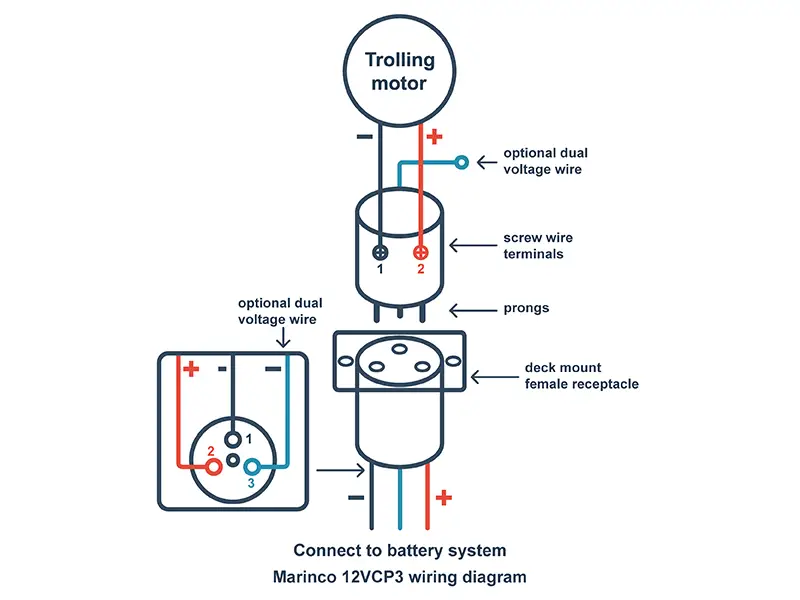
Marinco 12VCP3

The Marinco 12VCP3 is a heavy-duty prong style plug that is rated for up to 70 amps. This one design plug can be used for 12, 24, 36, and 48 volt systems.
The corrosion-resistant brass plated hardware fits wires up to 6 gauge. An O ring creates a watertight seal to protect the prong assembly from corrosion.
Pros:
- 70 amp rated
- watertight seal
Cons:
- Non-locking
Click here to see on Amazon.com
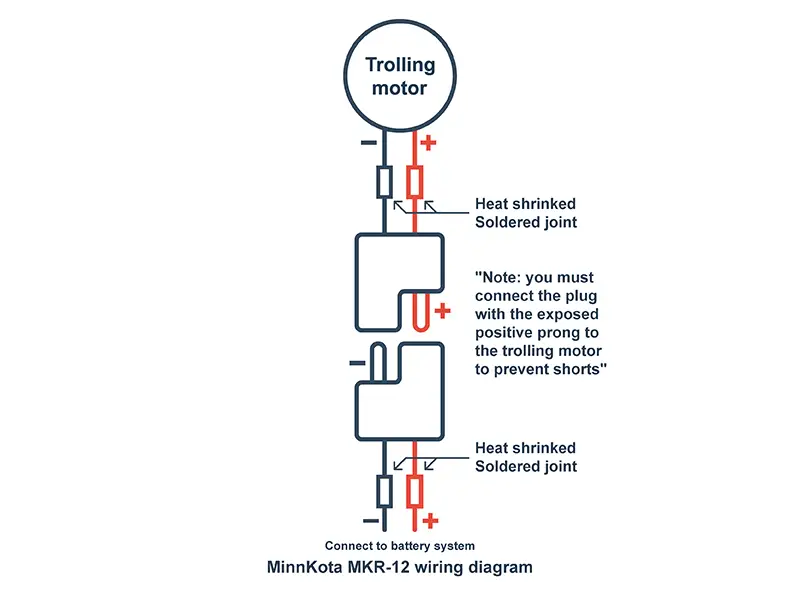
Minn Kota MKR-12

The Minn Kota-12 is an alternative to the traditional trolling motor plug and electrical socket rig. This is a quick connector plug that accomplishes the same effect as the traditional plug and socket setup, just without doing as much work during the installation. Work like mounting the socket into a sideboard or dash.
Pros:
- Inexpensive.
- Easy to Install.
Cons:
- Connection Not as Secure.
Click here to see on Amazon.com

Minn Kota MKR-20

The Minn Kota MKR-20 quick connector is similar to the MKR-12. However, it is a step up in terms of quality and establishing a secure connection. This trolling motor quick connect has a snap-lock feature and it is designed for use with 6 to 12-gauge wiring.
The package includes two plugs, four contacts, and four solder plugs for securing the wires into the contact points.
Pros:
- Inexpensive.
- Easy to Install.
- Compatible with 6 to 12-Gauge wire.
Cons:
- Wires Not Included.
Click here to see on Amazon.com
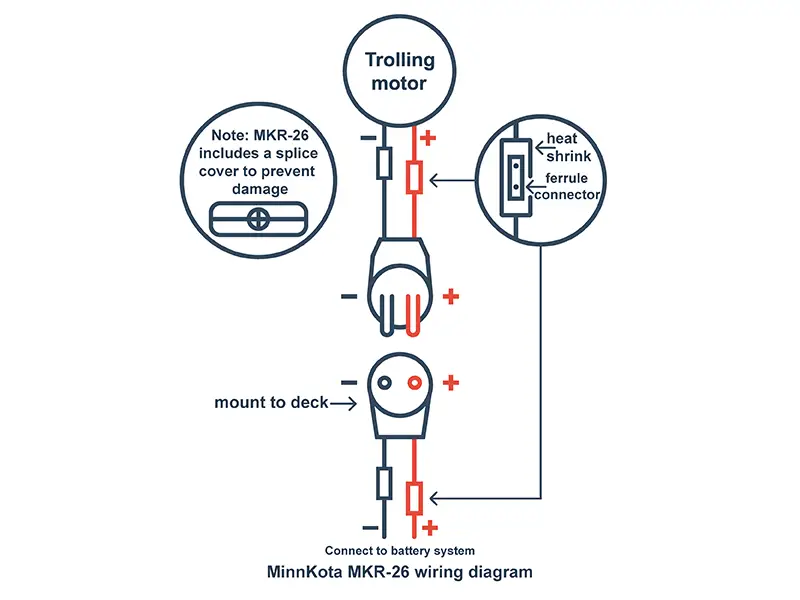
Minn Kota MKR-26

The Minn Kota MKR-26 is an excellent two-prong trolling motor plug that is completely waterproof and corrosion-resistant. This plug puts out 60 amps of continuous power, is easy to install with adjustable mounting orientations. Also, it is threaded to ensure a secure connection between the plug and the socket.
The Minn Kota MKR-26 comes in a kit with everything you need for installation.
Pros:
- Saltwater Compatible.
- 60-Amps of Continuous Power.
- The Connection is Secure and Threaded.
Cons:
- More Expensive Than Other Kits.
Click here to see on Amazon.com
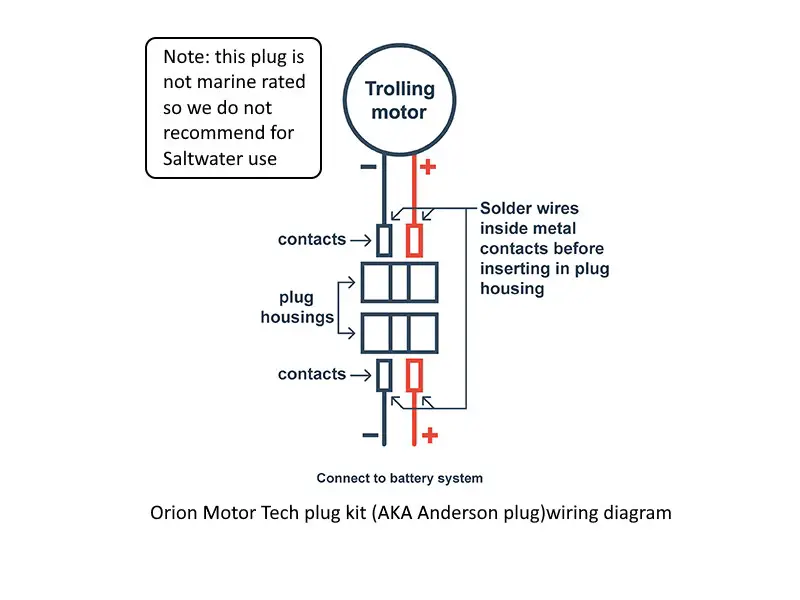
Orion Motor Tech Plug (Anderson Plug)

The Orion Motor Tech Plug is better known to be used for tow trucks, forklifts, and SUVs. These plugs, also known as Anderson plugs, can be used to set up a plug and socket connection for your trolling motor.
The only limitation is the maximum size of wire that can be used is 6-gauge. They still do rate at 50-amps of continuous power, which is enough for a 12-volt trolling motor setup.
Pros:
- Inexpensive and easy to replace.
- Versatile.
Cons:
- Not Rated for Saltwater.
Click here to see on Amazon.com
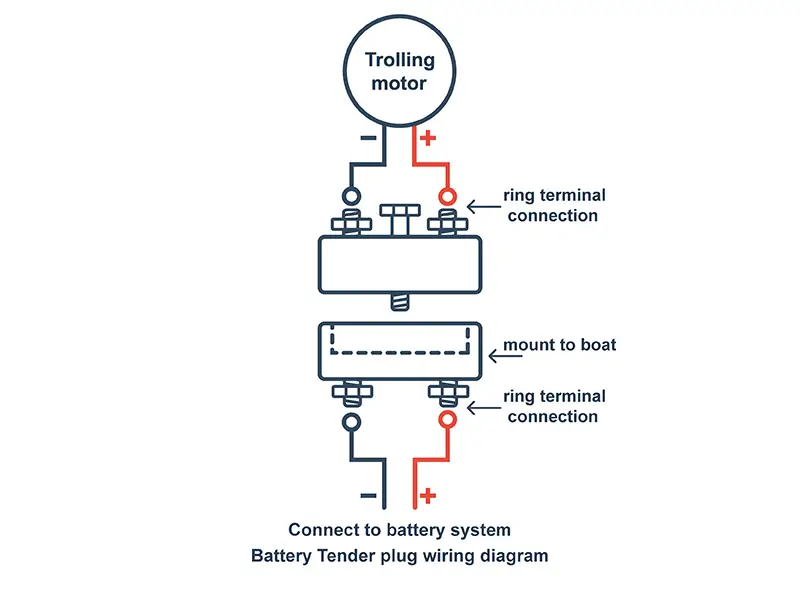
Battery Tender Trolling Motor Plug

The Battery Tender trolling motor plug is an excellent way to establish a secure connection from your trolling motor to your battery that is secure, easy to connect and disconnect, and that is complexly corrosion resistant.
The 80-amp rating is the highest amp-rated plug in this round-up, and its stainless steel hardware and silver-plated copper contacts make it a top performer.
The Battery Tender is an incredible product for your trolling motor; however, it is versatile and can be used with navigational electronics, fish finders, and any other DC accessory you may have in your boat.
Pros:
- Stainless Steel Hardware and Silver Coated Copper Contacts.
- Rated at 80-Amps.
- Easy to Install, Connect, and Disconnect.
- Covered by 5-Year Limited Warranty.
Cons:
- More Expensive Than Other Quick-Connects.
Click here to see on Amazon.com
Check out our article for a more detailed review of Trolling Motor Plugs.
Conclusion
No matter your reason for installing a trolling motor plug and socket or a quick-connect setup, you will be sure to realize the endless number of benefits after installation. There is no excuse for not installing a trolling motor plug onto your trolling motor and power source connection with options in every price range.
Once installed, you will now easily be able to disconnect power from your trolling motor to perform maintenance or part replacement and for winterizing your boat and storing the motor and battery for winter.
FAQ
Q: Is a fuse/circuit breaker required on a trolling motor setup?
A: Check with your local and state boating regulation laws to be 100% sure of your requirements when it comes to marine electrical setups. The Coast Guard does require a circuit breaker on inboard motor boats for any ungrounded current-carrying conductors. ABYC calls for a breaker or fuse within seven inches of the positive battery terminal on any current-carrying conductor. ABYC standards are guidelines and best practices recommendations that you should follow. While these practices are good to follow for safety, many insurance companies will only cover boats that follow these guidelines.
Q: If I do not have a good location to install and mount a trolling motor socket, what options do I have?
A: Some plugs do not require a mounting location, like the Minn Kota MKR-12, so we recommend using heavy-duty zip ties to secure the plug while still allowing for easy use. For other plugs with flanges and mounting screws, we recommend installing a mounting plate to attach to a solid surface on your boat.
Q: What if I am uncomfortable installing a trolling motor plug wire setup?
A: Safety is always number one. If you feel uncomfortable performing the install, contact a service center or dealer where you purchased your trolling motor for assistance.
[…] your motor from your battery before charging. This is where a battery switch can come in handy or a quality trolling motor plug. Disconnecting your motor from the battery will protect your electronics from power […]