Many of my Facebook followers know that I am into four things right now, fishing, websites, youtube, and mining bitcoin. So, I thought I would make a small post and share a few of the items I would buy today for a mining rig.
Yes, I know that this will be low traffic, but hey it will be a fun read for my Facebook friends and youtube followers.
Note: most links in this article are Amazon.com Affiliate links, see Affiliate Disclosure, thank you.
What is the Goal?
My goal is to build a mining rig that is cost-effective, power-efficient, and produces enough money to make it worth the effort. I need to start with cards that I can get at a fair price but are new enough to have staying power. I don’t want to buy a card and have it not be able to mine anything of value next year.
Some cards are power-hungry and this can be an issue but the overall hash rate to power is the main concern when picking a card. A good card needs to mine at a fair speed per watt.
Finally, why build a mining rig that doesn’t make any money, what a waste of time. I need to make at least twenty dollars a day or I could spend my time and money on a new website, lol.
Picking a Motherboard
My biggest concerns when picking a motherboard are compatibility, ease of use, price, and durability. These factors are in no particular order because they are all important, so I wrote them down as they came to me.
I want a motherboard that I buy today to be compatible with everything that is being produced today. It would suck to buy a board that would not work with the top-of-the-line GPU.
Easy setup is a must, because who wants something that is hard to get going and maintain. A dedicated mining board with the latest drivers should do the trick.
Price is a big concern because this is all about making a profit. No need to spend more than you need to on some high-end gaming board that will require adapters and updated drivers to mine eight GPUs.
Finally, I want something that will work for years to come. As any miner knows it is all about getting long life from your mining rig that makes it profitable. most miners plan on their rig running nonstop for three years.
My Top Picks
- Includes 2 1800Watt power supply (not tested)
- 8*PCIE 16X Graphics Card Slots,575mm Spacing.
- High Performance of Computing,10% Higher Than Same Level Motherboards.
- Equipped Sodimm DDR3 Memory Slot,8*6PIN PCIE X16 Power Supply Socket,Significantly Improve Motherboard Performance.
- The Voltage Stabilizing Capacitor Can Provide A Stable Voltage for Your Power Supply Equipment.
- It Can Ensure Quiet Performance, Low Power Consumption, Less Heat Generation, Energy Saving and Safe Use.
If this package is not available or you would like to use a different PSU Click here for a US listing for the BTC-s37. Also, a great PSU for 8 medium-powered cards or 4 high-powered cards is the Mystic mining PSU, but it is 240 volt.
If you want to use server PSUs the HP 1200 watt (at 240 volts) is our top choice, but don’t forget the breakout board and wires. When you look at the Amazon.com listing it normally recommends a bundle including everything you need to get started. However, if you want to link these together you might want to look at parallel miner for a good HP breakout board kit.
For low-power 120volt systems the Corsair RM850x, 850 Watt, 80+ Gold Certified is a great option, it is budget-friendly, reliable, and you can easily ad another to increase your total wattage.
2 – USB flash drive 3.0 16gb (with LED indicator and 32gb)
- High-speed USB 3.0 performance of up to 130MB/s(1)
- Transfer a full-length movie in less than 30 seconds(2) [(2) Based on 1.2GB MPEG-4 video transfer with USB 3.0 host device. Results may vary based on host device, file attributes and other factors]
- Transfer to drive up to 15 times faster than standard USB 2.0 drives(1)
- Sleek, durable metal casing
- PC3-12800 (1600MHz) Data Rate
- 204-Pin Dual in-line memory module
- Non-ECC Unbuffered SODIMM
- 5 Rank Double Sided Module
- 7.8US Refresh Interval (8192 CYCLES/64MS)
- 1.35V Power Requirement
4 – XFX Speedster QICK319 AMD Radeon RX 6700 XT Black Gaming Graphics Card (SWFT309)
- Chipset: AMD RX 6700 XT
- Memory: 12GB GDDR6 AMD RDNA 2 architecture elevates and unifies the gaming
- Boost Clock: Up To 2622MHz
- Cooling: XFX Speedster QICK319 Triple Fan
4 – PowerColor Red Devil AMD Radeon RX 6700 XT Gaming Graphics Card
- Video Memory: 12GB GDDR6
- Stream Processor: 2560
- Game Clock: 2514MHz (OC) / 2433MHz (Silent)
- Boost Clock: 2633MHz (OC) / 2615MHz (Silent)
- Memory Clock: 16 Gbps
4 – PowerColor Hellhound AMD Radeon RX 6700 XT
- Package weight : 2.0kg
- Stream Processor: 2560
- Game Clock: 2424MHz / Boost Clock: 2581MHz
- Memory Clock: 16 Gbps
Current favorite low power GPU
8 – XFX Speedster SWFT 210 Radeon RX 6600
- Chipset: AMD RX 6600
- Memory: 8GB GDDR6 AMD RDNA 2 architecture elevates and unifies the gaming
- Boost Clock: Up To 2491MHz
- Cooling: XFX Speedster SWFT210 Dual Fan Cooling
8 – MSI Gaming AMD Radeon RX 6600 128-bit 8GB
- Chipset: Radeon RX 6600
- Boost Clock: 1792 MHz
- Video Memory: 8GB GDDR6
- Memory Interface: 128-bit
- Output: DisplayPort x 3 (v1.4a) / HDMI 2.1 x 1
ON SALE 4/27/22 – click the link below to see the price
MSI Gaming GeForce RTX 3060 Ti LHR 8GB GDRR6
Optional parts
Not everyone wants to go with the basic setup. Some people like to have on/off switches and solid-state drives but the items are optional upgrades.
EARUMZDQ On/Off Push Button Switch (Pack of 5)
- 19.6inch. Fit most computer cases, keep a Power SW cord in your toolkit for testing or repairing a motherboard.
- fits a motherboard’s 2-pin power switch (Power SW) header, also works well as a restart switch.
- easy to install
- 5-pack 2-pin power switch cable
Native Onboard mSATA SSD
I inserted this section here because the BTC-s37 motherboard has an mSATA slot on the board making mSATA the best SSD to use. Once you have flashed your operating system on your mSATA SSD you install it to your motherboard then you are up and running. These drives last far longer than a USB stick and are large enough to contain operating systems like Windows. You will need an mSATA SSD dock and cable.
USB 3.0 to mSATA or M.2 Card Reader Dock
- Supports M.2 NGFF SATA SSD and mSATA SSD. DO NOT support M.2 NVMe SSD
- USB 3.0 compatible
- Hot-swap, plug and play, no driver need. Compatible with Windows XP/Vista/7/8/10 & MACOS
- The item included one USB to SATA cable
- Capacity 64GB SSD with SMI controller; Msata
- 3 years warranty
Just to keep it easy, if you want onboard mSATA drives, use this link for the Dock and cable, then use this link for as many mSATA drives as you need (1 for each rig-motherboard)
LEVEN SSD (64GBX10pk) SATA Internal Solid State Drive , (1pk 64gb SSD)
- 64 GB of high-speed storage internal SSD
- high-performance transfers
- 7mm slim design suitable for notebook and desktop.
- 3 years warranty provided by the manufacturer from date of purchase
BENFEI USB 3.0 to SATA III Hard Driver Adapter
This is a basic cable to connect your SSD to a USB 3.0 port.
Of course with this board, you can use an mSATA SSD without a cable but you will need a dock to program it.
Cable Matters 10-Pack Snagless Cat 6 Ethernet Cable 14 ft (rainbow 10pk 7 foot)
- High Performance Internet cable is Cat6 rated; The Ethernet cord with 24 AWG
- Cat6 performance at a Cat5e price
- A Category 6 Ethernet patch cable is also referred to as a Cat6 network cable
- The connectors with gold-plated contacts and strain-relief boots
- Flexible and durable RJ45 cable with high bandwidth of up to 550 MHz
Cooling Fans
If you are having cooling issues you should start by looking into fans. The BTC-s37 motherboard has a 4-pin system fan plug and three 4-pin ventilation plugs on the board. However, I am a fan of using a separate device to manage my fans.
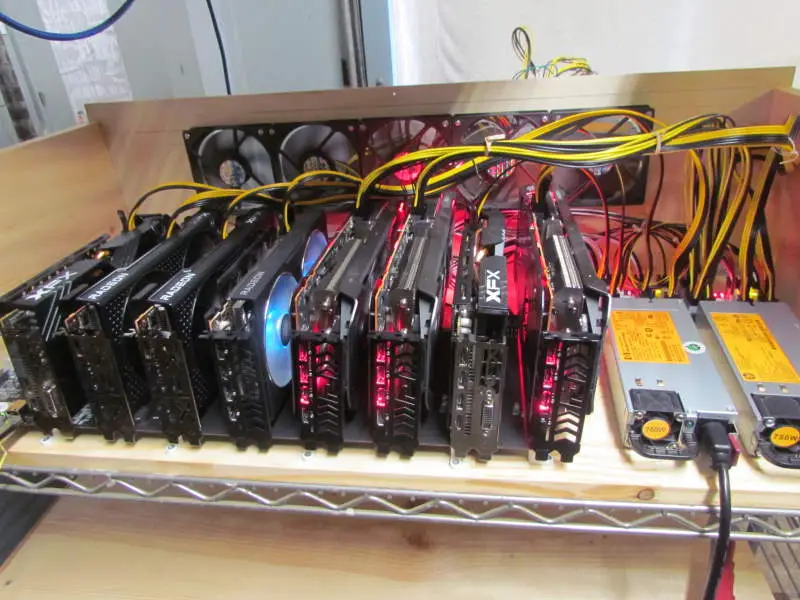
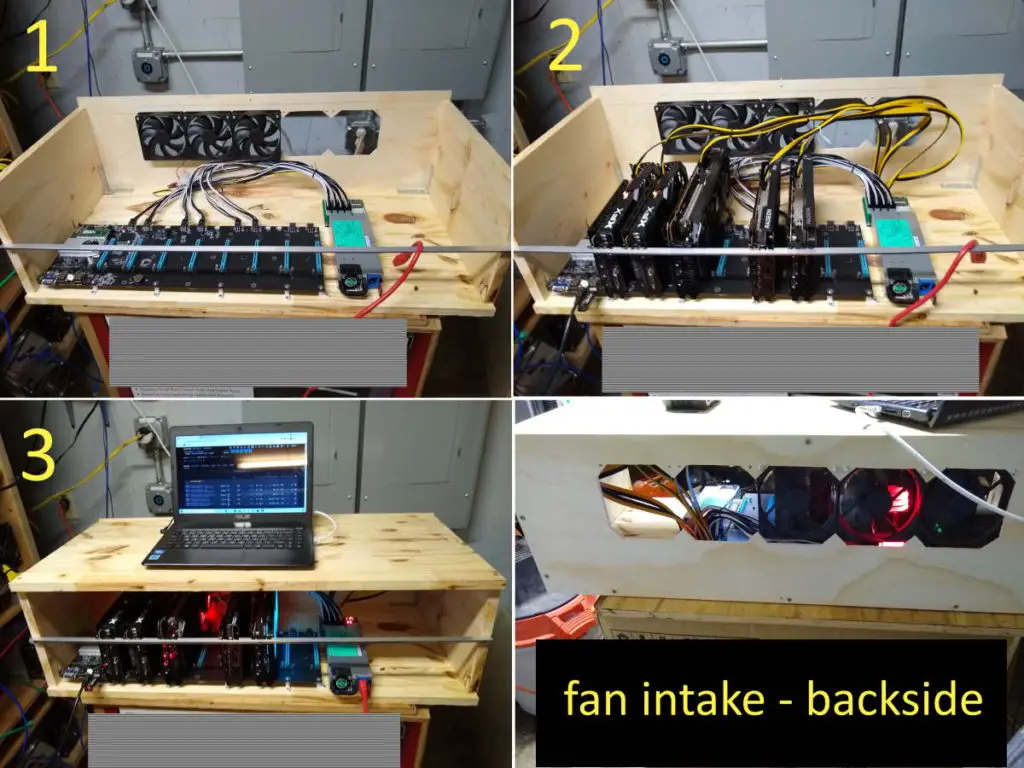
In the picture below you can see standard PC fans that use a 6-pin to Molex connector from the server PSU. These fans are great for standard cards in a cool environment.
If you are in a warm environment or have a hot card like a 3080ti or 3090 you are going to want something like an ASIC fan. Three ASIC fans will plug directly into your BTC-s37 motherboard but if you need more then you will need splitters or a separate controller.
8 Fan Hub Knob Cooling Fan Speed Controller (low-speed fans only)
This is my preferred combo
PC Fan Splitter Extension Cable – 1 to 2 PWM Fan Splitter Compatible
Don’t forget Power Distribution (PDUs)
- 30A single phase 208/240V Basic Power Distribution Unit / PDU (agency derated to 24A continuous)
- Attached NEMA L6 30P 30A 208/240V input plug with 12 feet/ 3.6meter line cord
- 1U horizontal rack mount format installs in one rack space
- 10 C13 outlets (8 front facing / 2 rear facing)
- 2 year limited warranty
APC Rack Mount PDU, Basic 200V-230V/30A – NEMA L6-30P (5.0 kW)
- 200V-230V Input, Basic 30A rackmount Power Distribution Unit
- Input: NEMA L6-30P (5.0 kW)
- Output Receptacles: Ten (10) C13 Outlets
- 1U Horizontal Mounting PDU
- Cord Length: 11.8 feet
Note: let your electrician install the circuit and the plug, but you should provide the plug to avoid confusion. Here is a link to a plug that will be compatible with the NEMA L6-30P input. Click here to see on Amazon.com.

PDU power cable C14 to C13 6 Feet 18AWG 2 Pack
- STANDARD C14 Plug to C13 Connector. Rated for 10 Amps and 250V.
- 6 foot length
- Can be used to extend a C13 cord
- UL listed.
If you are going to run low-power mining rigs you might want a PDU with more c13 outlets, check out the PDU below. Don’t forget you are still limited to 30 amps peek draw, constant 24 amps.
APC Rack Mount PDU, Basic 200V-240V/30A, (24) Outlets, 0U Vertical Rackmount (AP7541)
- 200V-240V Input, Basic 30A rackmount Power Distribution Unit
- Input: NEMA L6-30P (5. 0 kW)
- Output Receptacles: Twenty (20) C13 Outlets, and four (4) C19 Outlets
- 0U Vertical Mounting PDU
- Cord Length: 9. 8 feet
Extension Cord L6-30P/L6-30R 10GUAGE (10FT)
- 10 foot length
- 10 awg
- twist-n-lock
- 7500w
Tools
Of course, any good tools that will work with your build without damaging the parts is are good tools. However, we have a tool kit made for computer and GPU maintenance.
This set includes all the tools you should need to build and maintain your rigs.
- anti-static wristband
- opening tools
- scrapping tool
- picks
- prying spudgers
- screen removal suction cup
- tweezers
- driver and bit set (screw driver)
Arctic Silver 5 AS5-3.5G Thermal Paste
I can’t one paste is better than any others but this is the one I used on my last round of maintenance, and it worked great.
Adding more GPUs
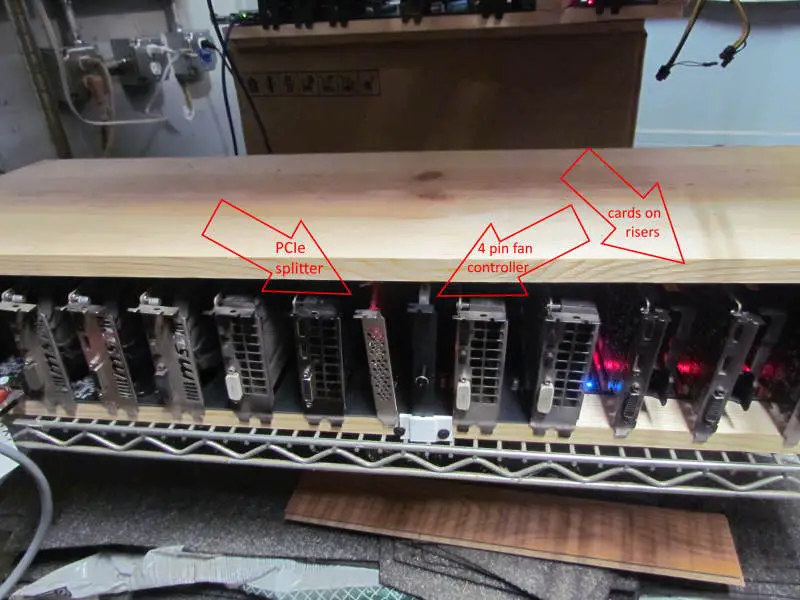
If you are going to add more GPUs to your system you are going to need a PCIe splitter, risers, and cables. Don’t forget to calculate your PSU usage and don’t go over 80% without overclocks, just in case.
1- PCIe 1 to 4 PCI-Express 16X Slots splitter for risers
- splits a PCIe 1x slot to 4 PCIe slots when you add risers
- improved heat sink/cooler
- Standard USB 3.0 to riser plugs.
- Removable slot cover
1- PCI-E 1 to 6 USB Slots Riser Card – USB 3.0
- splits a PCIe 1x slot to 6 PCIe slots when you add risers
- improved heat sink/cooler
- Standard USB 3.0 to riser plugs.
- Removable slot cover
1 – 6 pack PCI-E 1X to 16X Riser Card
- 16X Riser Card V011-PRO Version PCIe riser Card
- 10 capacitors
- Multi-interface power supply – Dual 6PIN ports, side or end connector
- 60 cm USB 3.0 cable
Note: Throw the SATA to 6 pin connectors in the garbage as they are not suitable for mining
2 – PCI-e 6 Pin to Dual PCIe 8 Pin (6+2) Power Y-Splitter Extension Cable (5pk 16ga)
- Conector A – GPU 6 pin female ; conector B – 2 x Pcie 8 pin (6+2) pin male;Genuine new copper cores
- Convenient solution for adding two extra PCI Express connectors to your existing power supply
- 6 Pin female end to connect to the power connector of the power supply and two 8 Pin (6+2) male ends to plug into the video graphics card or riser power
- Compatible with 6-pin & 8-pin graphics cards from popular manufacturers 9-inch (23cm).
- 16 inch 6 to 2×6 (PCI-e 6 pin ; Conector B – 2 x PCIe 6 pin male)
If you are in a hurry buy one of each and you can add 5 low power GPUs to your BTC-s37
- PCI-E 1 to 6 USB Slots Riser Card – USB 3.0
- 6 pack PCI-E 1X to 16X Riser Card
- PCI-e 6 Pin to Dual PCIe 8 Pin (6+2) Power Y-Splitter Extension Cable (5pk 16ga)
If you are planning to spread your GPUs horizontally you will need longer USB cables.
4-Pack USB 3.0 A to A Cable – 3FT USB to USB Male to Male Cable
Build Frame / Case
There are many frames that you can use to build your rig oo when using the BTC-s37 motherboard but for most average size GPUs I prefer no frame at all. A simple piece of pine can be bought from your local hardware store or lumber yard.
Mounting the board can be done with screws and 20mm spaces or you can use motherboard standoffs. I like you put motherboard standoffs down the middle and plastic spacers along the edges.
Supplies I purchased
- Nylon Standoff Motherboard Assortment Kit
- PCB Board Mounting L Feet with Screws
- 150Pcs 10 Sizes ABS Plastic Round Spacer Assortment Kit
- 50pcs ABS Round Spacers, Washers Assortment
When using high heat GPUs like a 3090 a case is almost a must-have for good airflow. High flow fan like a 4 pin ASIC fan will connect straight to the motherboard and provide all the airflow you need to cool your cards.
Another issue for large GPUs is support, adding a piece of aluminum angle bracket makes a great mounting bracket. Do keep in mind that everything needs to lineup, so test fit your board and GPUs before securing them.
Ventalation / Cooling
Cooling is one of the main concerns with any type of mining machine. The main focus of my cooling has been ASICs be the same approach works just as well with GPU rigs.
I popped out a window, installed an industrial barn fan, added a screen and security bars as my primary form of negative pressure, aka exhaust. Then I built a box out of 3/4 inch plywood with shelves as part of the structure.
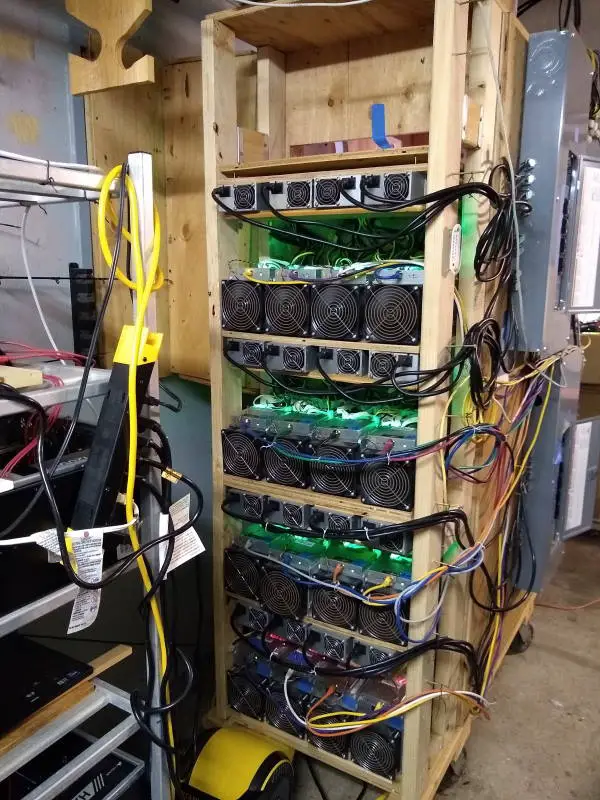
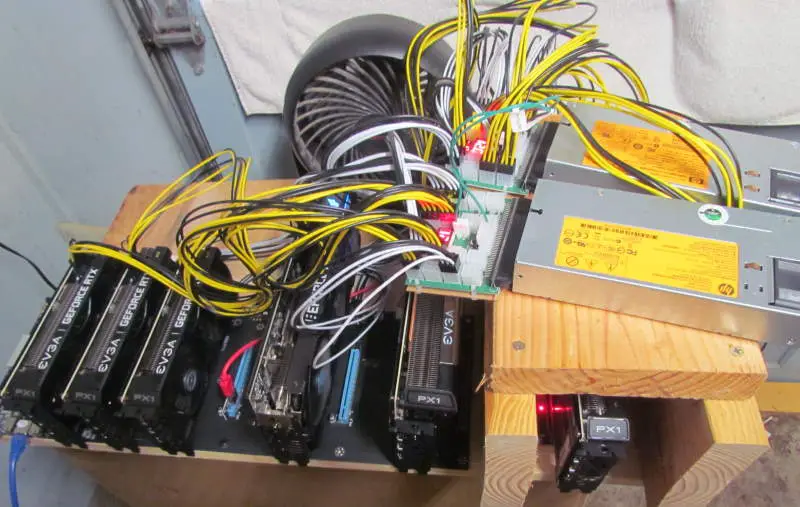
I have most of my old GPU rigs in Rosewell server cases on an old meat rack with wheels. You can see the rack on the left edge of the picture above. When I am not working on the ASICs or GPU rigs I move the rack next to the ASICs.
By placing a piece of plywood from the top shelf to the top of the rack most of the heat goes straight through the vent box and outside. During the summer I do run an input fan to draw air from a vent system located in the shade.
If you are installing a basic attic fan here are 3 High Power multi-speed options manufactured by QuietCool. The upgraded option includes a smart controller that you can control via a phone app. There are 3 standard options but we have narrowed it down to the two most useful models.
Attic fan – AFG SMT PRO 2.0 – 1959cfm – 16.5 inch Dia. 108 watts – Blue
Attic fan – AFG SMT PRO 3.0 – 2860cfm – 16.5 inch Dia. 205 watts – Red
BTC-s37 Motherboard PCIe Slot Order
Most people know that your slots don’t load in the order that they are arranged on the motherboard. This is one reason many people prefer to load identical cards in one mining rig, including me.
As of the time of this post, I could not find a slot map online so I got busy and mapped the board I have running. My process started with getting out blue painter’s tape and labeling the GPUs with their current HiveOS GPU number. The motherboard is labeled PCIe 1-8 so on a piece of paper I made notes of the location of each GPU.
Finally, I shut down the rig and moved GPU 6 into each of the empty PCIe slots then noted the new GPU order in HiveOS. Note: GPU6 is the only Powercolor 6600 I have so it is easy to see in HiveOS.
Here is the results table:
| PCIe motherboard slot # (1-8) | . GPU # (0-7) . |
| 1 | 1 |
| 2 | 3 |
| 3 | 4 |
| 4 | 5 |
| 5 | 6 |
| 6 | 7 |
| 7 | 0 |
| 8 | 2 |
I have not had the chance to test it on another board but plan to when I get to my buddy’s mine.
Here is the slot order written out if it helps you: 1, 3, 4, 5, 6, 7, 0, 2
Octominer x8 ultra GPU slot order
I don’t have an Octominer so I got this information from another mining content producer, but I thought it would be useful to document for anyone using Hive. Also, I list the placement order look at the GPU bracket.
X8 ultra slot order 2, 1, 0, 7,(control board), 3, 4, 5, 6
Conclusion
This should be a simple build that you can put together and make a wooden frame out of 2x1s with no issues. Flash HiveOS on your USB sticks and make a duplicate in case it crashes.
Then you are off to the races. Follow me for tips and watch me set up one. Search this website name on Facebook to message me.
Also
Don’t forget that you will need a separate computer to run your business and monitor your mining rig. My top choice to balance performance and cost is an HP laptop, specifically a 17.3 inch running an i3-1115, 16GB ram, and 1TB SSD; check it out on Amazon.com.
..