In the most basic terms, essentially, a Minn Kota heading sensor is a compass device that communicates with your trolling motor to help your motor steer in the direction you desire accurately. Simple enough, right?
It is simple when you break it down to the basics, but it is a little more complicated than that. The Minn Kota heading sensor has a built-in compass combined with the GPS sensor in your trolling motor and keeps track of your location and direction.
Position and heading information are communicated to your i-pilot via Bluetooth to increase accuracy, improving your trolling motor’s features. Improved features include Spot-Lock, AutoPilot, and any other positioning features used by the i-Pilot and i-Pilot Link systems. The Minn Kota heading sensor adds so much to your fishing experience.
Now that we know what a Minn Kota heading sensor is and its function, let us review a step-by-step guide on how to install the heading sensor onto your boat and how to pair it to your Minn Kota trolling motor.
Note: most links in this article are Amazon.com Affiliate links, see Affiliate Disclosure, thank you.
What’s Included?
The Minn Kota heading sensor kit comes with the sensor, attached power wire, and two stainless steel #8 screws for mounting purposes. You will need to purchase a fused 1 amp wire or spot on your fuse panel to connect your power wire.
Who is This Product For?
The Minn Kota heading sensor is for any angler who wants to take full advantage of the spot-lock feature that the Minn Kota i-Pilot and i-Pilot Link systems have to offer.
You can add the Minn Kota heading sensor to any Minn Kota PowerDrive, and Riptide PowerDrive trolling motor manufactured 2017 and after. They must have had pre-installed Bluetooth i-Pilot systems in the motor.
The Minn Kota heading sensor comes standard with all new Minn Kota Ultrex, Ulterra, Terrova, Riptide Ulterra, Riptide Terrova trolling motors manufactured 2017 or later.
Click here to read our article Minn Kota Ulterra 80 Trolling Motor Review
Installation Overview
Any order to professionally install and pair your Minn Kota heading sensor, you will need the following tools.
- Drill
- 1/4″ Drill Bit
- 9/64″ Drill Bit
- Phillips Head Screwdriver
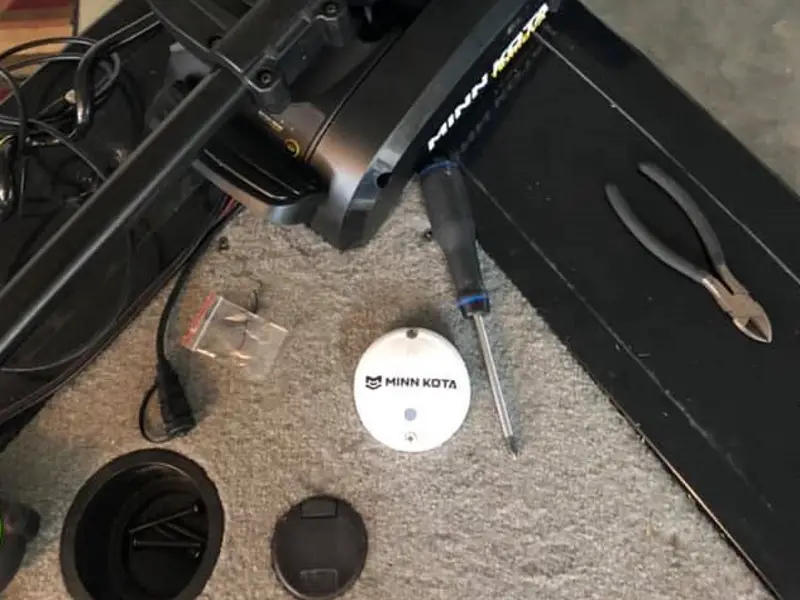
Mounting Your Minn Kota Heading Sensor
Before you install your Minn Kota heading sensor, you will need to find an appropriate location. The first factor you need to consider is interference from electronics and boat structure. Roughly twelve inches from your depth finder or radio equipment should suffice.
Next, once you determine where you would like to mount your Minn Kota heading sensor, see if you will have access to the power cables coming from the heading sensor under the mounting location. Ensure the location is close enough to a power source that you can easily run the wiring from the heading sensor to the power source.
If you have access under the mounting location, follow these steps.
- Place the Minn Kota heading sensor flat on the surface of the mounting location.
- With a shop pencil or grease pen, mark on the surface the location where the power cable will pass through.
- Take your drill and the 1/4″ drill bit and drill a hole through the surface.
- Thread the power cable through the drilled hole until the heading sensor can lay flat on the surface.
- Position the heading sensor with the arrow pointed toward the front of the boat in the direction of travel.
- Mark the two screw holes’ locations to be used to secure the heading senor to the surface.
- With the 9/64″ drill bit, drill two holes where you have previously marked.
- Apply marine-grade sealant to the screws that came with your heading sensor, and using your Philips head screwdriver, insert the screws through the designed holes on the heading sensor and into the predrilled holes.
- Hand tightens until the heading sensor is secure to the mounting surface.
If you DO NOT have access under the mounting location, follow the same steps as above. However, skip the step requiring you to drill a hole into the mounting surface for the power cable to pass.
Instead, make sure the arrow sensor is pointed toward the front of the boat and parallel with the boat’s keel. There are two notches on the heading sensor that will allow the power cable to pass out one of the sensor’s sides.
Feed the power cable through the notch that is easiest to run the cable to the power source. Now you are ready to hook the heading sensor up to the power source.
Click here to read our article Self Deploy Trolling Motors: What You Need To Know
Hooking Up the Minn Kota Heading Sensor to the Power Source
You will need a 12-volt marine battery as the power source for your heading sensor. Additionally, you will need to make sure you set up the connection with a one-amp fuse, either in-line or connected to a fuse panel. The heading sensor wire is 22 gauge so don’t forget compatible connectors and wire extensions if your power source is more than 9 feet away.
- Run the power cable from the heading sensor to your 12-volt marine battery power source. ( * see note below)
- Add a small inline fuse to the end of your red heading sensor power cable.
- Connect the fused positive red connection from the power cable to the positive red terminal on the battery.
- Connect the negative black connection from the power cable to the negative black terminal on the battery.
Now that you have an electrical connection established and power on your Minn Kota heading sensor.
*note: The heading sensor has a constant 1mA power draw so you should attach it to a switched power source that can be turned off when not in use or have your boat battery plugged into a maintenance charger.
Consider purchasing a fuse kit that has inline fuse holders and an assortment of fuses to make your installation easy. Here is the budget-friendly kit I used on my last install. I purchased it on Amazon.com and have extra parts and fuses for my next project. Also, don’t forget a butt connector kit.
Pairing Your Minn Kota Heading Sensor
Before painting your heading sensor, you should understand how the lights work to communicate with you what mode it is in and what is happening.
- When the heading sensor is powering on, the light will turn on for a solid three seconds and then turn off.
- When the heading sensor is pairing, the light will flash will on and off twice per second for up to 20 seconds or until the device is successfully paired to the i-Pilot or i-Pilot Link system.
- When the heading sensor is properly paired, and normal operations occur, the light will flash on and off once every three seconds.
To successfully pair the Minn Kota heading sensor to your trolling motor using i-Pilot or i-Pilot Link, follow these steps.
- Make sure your heading sensor is connected to a power source and that it is powered.
- Power on the trolling motor.
- Press the pairing button on the heading sensor and make sure you see the light begin to flash on and off two times per second.
- Go to the trolling motor and hold down the pairing button on your trolling motor’s i-Pilot or i-Pilot Link control head.
- When they are successfully paired, release the pairing button on the trolling motor’s control head and watch the light on the heading sensor. It should begin to flash on and off once every three seconds to indicate normal operation.
Your trolling motor and heading sensor should now be successfully installed and paired. You will now be able to fully utilize the i-Pilot or i-Pilot Link system for your trolling motor.
For a detailed video describing the steps needed to pair your Minn Kota heading sensor to your trolling motor, check out this short YouTube video by Minn Kota Tutorials.
Conclusion
The Minn Kota heading sensor is completely necessary to utilize the i-Pilot fully and i-Pilot Link systems on any Minn Kota trolling motor model 2017 or later. Take full advantage of some of the features of i-Pilot and i-Pilot Link, including Spot-Lock and Auto-Pilot. These features will give you a more stress-free fishing experience by keeping you hands-free and focusing on catching fish rather than steering the trolling motor or maintaining your course.
As you can see, installing and pairing the Minn Kota heading sensor to your Minn Kota trolling motor is extremely easy. You should have no issues with installation if you follow these basic steps. However, if you have any doubts whatsoever, make sure you reach out to your local Minn Kota dealer and someone will gladly assist you in any way necessary.
FAQ
Q: Does a power cable come with the purchase of the Minn Kota heading sensor?
A: Minn Kota heading sensor has a power wire connected at the factory. The wire is approximately ten feet long, but you can add a power wire extension and a 1 amp fuse holder
Q: What gauge size is the power wire for the Minn Kota heading sensor?
A: Minn Kota heading sensor power wire is 22 AWG. In most cases, an overlapped solder connection with heat shrink is the best way to attach this size wire to an inline fuse socket. Also, we like male-to-female quick connects because you can connect different gauge wires, don’t forget to heat shrink the entire connection.
Q: What year does my Minn Kota trolling motor have to be in order to be compatible with the Minn Kota heading sensor?
A: You should have a 2017 model or later Minn Kota trolling motor that has either i-Pilot or i-Pilot Link capabilities and is Bluetooth compatible. Check the owner’s manual for compatibility details.
Q: How do I know my Minn Kota heading sensor is paired with my trolling motor?
A: When the heading sensor is paired correctly, and normal operations are taking place, the light will flash on and off once every three seconds.
Q: Can I mount my heading sensor on my boat’s hardtop?
A: You can mount your heading sensor on your boat’s hardtop or anywhere on your boat that doesn’t have magnetic interference. To test for magnetic interference while your boat is on the water with all devices on, take an old fashion magnetic compass and slowly move it around possible mounting locations. If your compass jumps around and fails to stably point north then you should consider a different location.
Q: How close can I put my heading sensor to my Minn Kota trolling motor?
A: Three feet or more is a good baseline for spacing between your heading sensor and trolling motor. You need to space so there is no possibility of magnetic interference. Before installing your heading sensor you should perform the compass test with your motor running at high trolling speed, like setting 6.