It’s Friday, you get off work early and head out to your favorite local fishing spot. The boat is launched, you jet out across the lake to a nice bass cove you know well.
You set up your trolling motor and lower it into the water. You give the motor some power but no movement. Looking down into the water, you see your Minn Kota trolling motor prop not spinning. What now?
Well, maybe drop an anchor or drift and try to salvage some fishing for the day. Afterward, you are going to want to address this issue immediately. When a trolling motor prop stops spinning, there could be many reasons why.
However, more often or not, it is one of these top three reasons why.
- First, you could have a broken prop drive pin.
- Second, your armature or brushes could have gone bad.
- Last, it could be an electrical issue within your control switch or control board.
Let us take a close look at the top three reasons your Minn Kota trolling motor prop is not spinning.
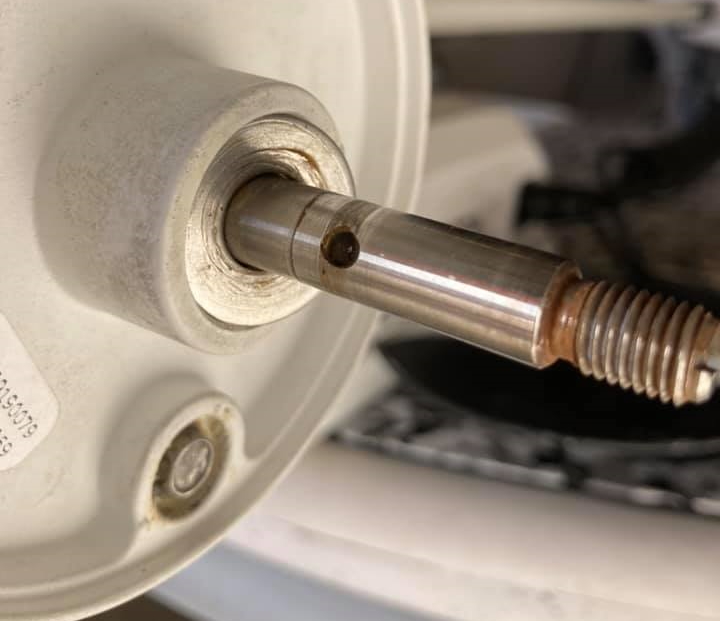
1. Broken Prop Drive Pin
What: A broken prop drive pin will cause your propeller to spin freely and spin disconnected from the motor’s driveshaft. An easy indicator of a broken prop drive pin is to take your finger and attempt to turn the propeller. If the propeller feels loose and spins freely, then you may have a broken prop drive pin.
Where: The drive pin is located behind the propeller.
Why: A drive pin can break from the propeller hitting a submerged log or some other underwater obstruction. The older the drive pin is, the easier it will break.
A drive pin is most often made from stainless steel and designed not to break even if the propeller hits something, so if it does break, you must have hit something hard. A shear pin is designed to break if you do hit something, protecting the motor.
How: Remove the anchor nut by twisting it off the cap from the propeller. Remove the propeller, remove the drive pin, replace the drive pin, then place the propeller correctly. Add on the anchor nut cap and tighten the cap with a wrench. If there is another pin that goes through the cap, be sure to put that back where it belongs.
Check out our article Minn Kota Trolling Motor Propeller Guide
2. Armature or Brushes Go Bad
What: The armature portion of a trolling motor conducts AC across the field and creates shaft torque. The armature converts electrical power to mechanical power. The brushes are a small part of the motor that conducts electrical current between the stationary wires and the motor’s rotating wires.
If either your brushes or armature goes bad, essentially, power from your battery to your trolling motor is interrupted and not converted to mechanical power.
Where: Both the brushes and the armature are located in the lower-unit housing of your trolling motor.
Why: Periodically, you may have to have your brushes and commutator professionally cleaned if you are experiencing either a propeller that is not spinning or if your trolling motor is cutting in and out, especially at higher speeds. Your trolling motor may have sprung a small leak that allows small amounts of moisture into the motor that can build residue and debris on your brushes and commutator over time.
If you continue to operate your trolling motor with this build-up on the brushes and commutator, you will have an excellent chance to burn out your armature. So, if your trolling motor prop is not spinning at all, this is a chance that you have been operating your trolling motor with dirty brushes, and the armature has completely burnt out.
How: Before proceeding, double check your warranty and see if brushes and armature are covered under your service agreement. It is good to get professional assistance when dismantling the lower unit and removing the armature and brushes. If your warranty is expired, or you are a do-it-yourself type of person, then go ahead and dismantle the lower unit.
Before you start, it is highly recommended that you take a permanent marker and create lines on the lower unit that shows you exactly how everything lines up. You must line it back up exactly how it was once you are finished to ensure the lower unit is properly sealed. You do not want future leaks.
Once you have opened up the lower unit, you will want to clean the brushes and test the armature to see if it is burnt out. Take a multimeter and test the armature. If nothing registers on the multimeter, you have a short, and the armature will need to be replaced.
Consider replacing the brushes too if they look in bad shape and a deep cleaning seems like it will not solve the issue. After replacement parts have been installed, go ahead, reseal your lower unit, and line up the markings you created before dismantling the lower unit.
Here is a video for you to watch that will give you an in-depth look into the inside of a trolling motor. Pay close attention to the lower unit.
If you need to order parts or want to send your motor in for repair you might need to find your serial number. We have an article covering serial numbers in detail and where to locate them on most motors.
3. Control Switch or Control Board Goes Bad
What: The control switch takes power from the battery setup and passes power to the armature and brushes to turn the electrical power into mechanical power. The control switch has the speeds settings, the off position, and the forward and reverse controls.
Where: The control switch is located in the top of the trolling motor where the hand controller comes out. Inside this compartment are the control switch, the hand control, and the wires from the battery to the armature.
Why: Control switches can burn out due to shorts. Shorts can occur when the prop is compromised by heavy mud, fishing line, and seaweed. Or by leaks in the lower unit and control switch compartment.
How: Replacing a burnt-out control switch is extremely easy. Go ahead and remove the control switch compartment cover with a Philips head screwdriver. Once inside, remove the hand control and remove all the wires from the control switch. Properly dispose of the old control switch and put it in the new one.
There are markings on the control switch to show you which wires go where. There should be two wires for the battery hook-ups and four wires for the armature hook-ups. Be sure to read the markings carefully and accurately, or you will short out your new control switch as soon as you give the motor power.
If you are not comfortable with this, contact Minn Kota for the location of a certified service agent in your area. This may be covered warranty as well, so be sure to ask.
If the information in this article didn’t cover your problem check out our article Electric Trolling Motor Problems: Top 6 Reasons Why My Motor Is Not Working.
Conclusion
There are three leading causes of a Minn Kota trolling motor prop not spinning. You may have an electrical issue like a burnt-out armature or control switch, or you may have broken a prop drive pin.
Most often, when a control switch or armature burns out, it is due to a short. Shorting can be caused by obstructions to the prop, leaks in the lower unit, and running your trolling motor on low batteries.
Be sure always to clean your prop after every use and remove any weeds or fishing line you may find. If your trolling motor cuts in and out when you are trying to use it, it may be a sign of dirty brushes and/or a leak in the lower unit.
A broken prop drive pin is most often the result of your prop coming into contact with something hard like a rock, submerged log, or the seafloor. Replace the broken prop drive pin, and you should be set to go.
For the most part, these are easy fixes that you can do yourself with proper instruction. Be critical of your sources when finding an online expert to help you with your repairs, and if you have any doubts, be sure to contact a Minn Kota service center right away.
FAQ
Q: What is the difference between a drive pin and a shear pin?
A: A drive pin is usually constructed with stainless steel and not designed to break, where a shear pin is made of bronze and designed to break when your propeller contacts something. The shear pin is a safety device designed to protect your motor. Both pins connect your prop to the rest of the motor, which is then controlled by the control switch.
Q: Why do brushes get dirty?
A: Most often, brushes get dirty due to small leaks in the lower unit. You may need to dismantle your lower unit to clean your brushes and to reseal it to prevent future leaks.
Q: How do I contact a Minn Kota service center?
A: Go to the Find a Service Provider section of the Minn Kota website and search for the service provider nearest to you.