This post contains step-by-step instructions and tips that are not included in the instruction manual and is meant to be an addition to your installation manual. Now it is time to get started.
First let me start by saying I am not a professional, I don’t hold any certifications nor have I ever been paid for install work. Electrical installation is one of those things that people kind of “wing it,” and I am not a fan of that.
I have taken ABYC webinars, follow ABYC codes and best practices on all of my installations. Additionally, I follow USCG codes listed in title 33 CFR 183 (Govinfo.gov, 2019). I have personally built many computers and installed several electronic items, including but not limited to alarms, stereos, backup cameras, trailer lighting, chart plotters, and electric boat winches.
My point in telling you all this is because I feel comfortable around electrical. If you don’t feel comfortable around electrical, this is the point you might consider buying your motor installed from a dealer.
When installing your electric trolling motor start with a plan
I have found that every time I start with a plan, my installations have gone very smoothly, so I recommend that you try this process.
After you have chosen your electric trolling motor, you should sit down and read the installation directions from cover to cover. It never fails that I get to the last page and I have connected a set of wires in the wrong order that must be connected in a specific order to complete the installation correctly.
Or worse, I must order a part to complete the installation. In your installation directions, there should be basic layout directions, wire sizing charts, and maybe diagrams for you to start your installation.
I follow these steps before starting the installation.
- read the directions
- look through any supplied diagrams
- place my equipment in the required location, dry fit only
- draw a diagram of my specific project
- measure wires, add 10% and transfer to the diagram
- inventory all required parts such as battery switch, fuses, wires, ring terminals, heat shrink, hangers, zip ties, fasteners, and even dielectric grease
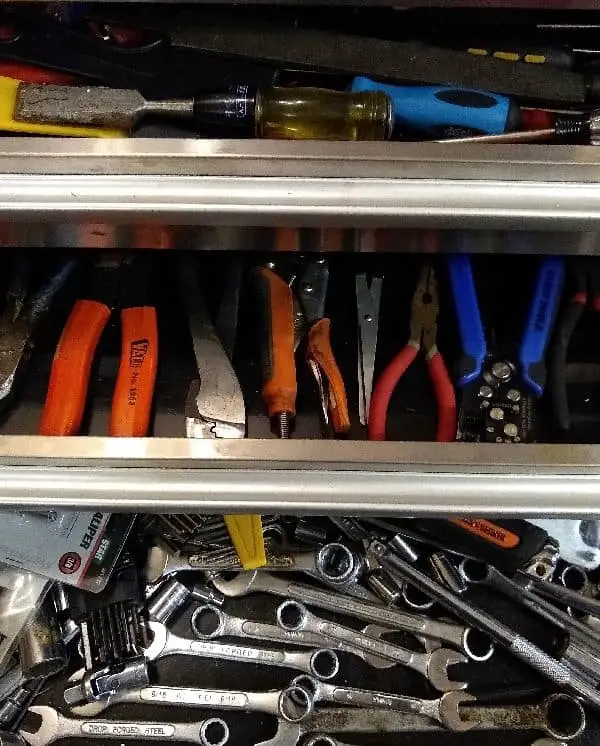
I will complete this process before I cut a wire or drill a hole in my boat just in case I need to purchase more parts before I start the installation. I should have put tools on the list, but in my case, I have so many different tools around my shop that my only concern is replacing broken drill bits.
Click here to read our article Best Trolling Motor Wiring Extension Kits.
Wire sizing:
In the Information provided by Minn Kota (Minnkotamotors.com, 2019), they site wiring charts from ABYC, and they are the authority for marine standards. There is one drawback to those charts, as the ABYC instructors will point out in their seminars when your battery is at 60% then your chart is not correct because of voltage drop.
I like to size the wire up to at least the next gauge. If you have two battery banks, you will need to measure the furthest bank from the trolling motor for your length on the wiring chart. Also, consider that as your connections might corrode, there will be increased resistance that will result in a voltage drop at the motor.
On a smaller boat, you will not have large formal areas for wires to run so you might consider USCG rated wire conduit or wire loom. Both of these products can help protect your wire as it is commonly hard to find places to secure your wires in a small boat. Remember that conduit and loom will retain heat so increasing your wire size will prevent the wires from overheating.
Plan out your access:
You will need to install your electric trolling motor while getting it as close to the center of the boat as possible. It can be challenging to get a wrench on the front two bolts of the motor mount. You need to reach in under the bow of the boat with a wrench and make sure you can tighten or hold in place the nut on the full length of the mounting bolts.
Another note to consider is that the motor is hard on the aluminum deck of your boat. You might want to consider reinforcing the deck of the boat by having a plate of aluminum welded to your boat.
Locating your batteries is all about access, and ventilation for some battery types. Small boats were not built with space in mind for the addition of up to four batteries; it can be a challenge to find a good location.
I removed the front seat pedestals and replaced them with storage boxes so that I could put batteries in the rear seat storage boxes. Putting the batteries in the storage boxes gave me great access, and I can open the boxes during recharge cycles for ventilation and to top off the flooded batteries.
Easy access to your junction points is very important while planning out the electrical runs you need to be able to inspect every junction point and replace it if needed. Having junction points exposed to the elements is something you want to avoid, especially saltwater, but a cover or a junction box can go a long way in preventing corrosion and still allowing access.
Dielectric grease is your friend. I add this to all of my terminals, caps, and crimped wire ends before I heat shrink them to keep the moisture out. However, do not put dielectric grease between connections because it can prevent conductivity.
Check out our article How Do I Mount A Trolling Motor On An Aluminum Boat?
Installing your electric trolling motor:
The most important tool on the list in the installation manual is a buddy to help. I start with the motor by marking and drilling the holes. Next, my buddy and I will attach the motor with the supplied bolts. I am a fan of adding extra fender washers to spread the deck pressure out and reduce the stress on the aluminum.
Another option I like is to spread the deck pressure is to use spacer blocks like the ones used when installing a trailer hitch receiver. These bolts should be included on the inspection list when you check your electrical system connections.
Battery charger:
Most people forget that the onboard battery charger is one of the most important things to find space for and install. If you are not going to use an onboard battery charger, then skip this step, but you will be installing one at a later time, trust me.
I place my battery charger as close as I can to my batteries and still reach shore power without an additional extension cord. In my boat, I have a storage box that houses the main battery bank and charger with just enough room for good air circulation and ventilation.
My secondary battery bank is located under the engine well along with the house battery(cranking), washdown pump, alternator charger, and dual bank shore charger. The equipment located under the motor well is all compact and low maintenance items because it is difficult to access.
Batteries:
Batteries are heavy, and your buddy can help you by lifting them to you or team lift to the deck of your boat. Before you place your batteries make sure you have installed straps or other means to secure your batteries, this doesn’t mean drilling holes in the bottom of your battery boxes.
The last battery trays I bought had tabs for the screw on the sides with j-bolts that tightened with wing nuts. In the past, I have purchased battery boxes that included a strap, screw, and foot clamps. The foot clamps can be attached to the floor of the boat or framing to run the battery strap through and secure the whole box to the boat.
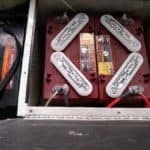
Junction Points:
My next step is to install the junction points, which in this project includes a trolling motor plug, battery switch, and fuses. If you do not need to unplug your motor, you might replace the plug with a set of terminal blocks to connect your trolling motor power and extension power wires.
Place your battery switch, but you do not need to fasten it securely until you connect the wiring. Also, you will need a negative terminal block to connect your ground wires in a location by the switch.
You need to run a heavy gauge ground wire to the boat for both battery banks. Then I install the EMPTY fuse holder in a location no more than seven inches from the positive battery terminal (per wiring code) if this is not possible now is the time to look up the code for an exception (link to USCG code here).
Next, I connect my first extension wire from the fuse holder to the battery switch (with the switch in the off position) and repeat the last two steps for the secondary battery bank. I connect the next extension wire to the battery switch and run it to the trolling motor plug or terminal blocks. I then connect the trolling motor to the trolling motor plug or terminal blocks.
Final connection:
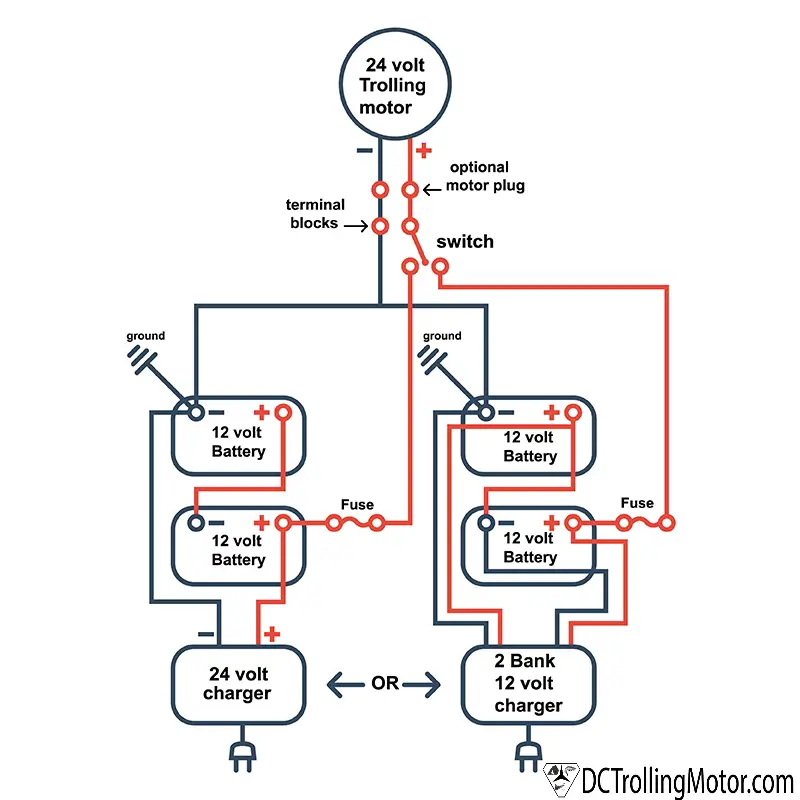
Everything is in place now, so we are in the home stretch now we need some power. It is time to connect the batteries, starting with the jumper for a 24-volt or jumpers for a 36-volt system and going from the negative on the battery that is connected to the fuse to the positive of its partner battery.
If you are doing a 36-volt system, you will need to connect the third battery in the same manner to the second battery. Then I connect the positive terminal to the fuse holder and install the fuse. Finally, I carefully connect the negative terminal to the motor negative wire and boat ground wire.
At this point, the battery is live, and you should handle tools with care not to short it out. I repeat these steps to connect my secondary battery bank. The next step is to test for power at the battery switch and see if the voltage is correct.
If the voltage is correct, then secure the switch and turn it on so you can test the voltage at the plug or last terminal blocks. Now it is time to put dielectric grease on the exposed connection and secure all the loose wire with wire clamps or zip ties. If you used any junction boxes or access covers seal them and plug in your battery charger so you can go fishing tomorrow, you earned it.
A few tips:
You can use manually reset trip-free circuit breakers per USCG code in place of fuses. I like fuse because I am sure they are working. If fuses do not blow they are cheaper to use than breakers.
From now on I will be buying pre-built marine wires. There are now several companies making custom lengths of tinned marine wires with terminals or connectors of your choice. I am a fan of this and will be replacing my current wires with these when my current wires corrode past repair.
Conclusion:
Installing an electric trolling motor is a job you can do if you read the installation manual, read the USCG code page, and make a pre-installation plan.
References:
Govinfo.gov. (2019). Electrical Systems. [online] Available at: https://www.govinfo.gov/content/pkg/CFR-2010-title33-vol2/xml/CFR-2010-title33-vol2-part183-subpartI.xml [Accessed 25 May 2019].
Minnkotamotors.com. (2019). [online] Available at: https://www.minnkotamotors.com/sites/minnkotamotors_site/files/condutor-gauge-and-circuit-table_1-22-19.pdf [Accessed 25 May 2019].