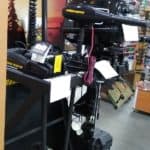
There are multiple parts of your trolling motor that you should be familiar with. There are three main parts that you need to be aware of to use your motor effectively.
- Remote control
- Depth collar
- Stow and deploy lever
There are many other parts to your bow mount electric trolling motor that you will want to have general knowledge of, but you will need to know how to use these three parts to use your motor.
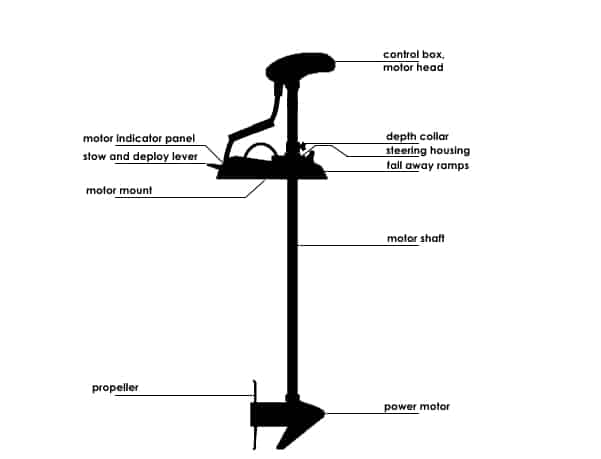
The other parts of your motor can be equally important but not on a minute-by-minute basis. You should also know these other parts and here is a list of some of them.
- Power motor
- Propeller
- Motor shaft
- Fall away ramps
- Steering housing
- Motor indicator panel
- Control box, Motorhead
- Motor mount
There are also a few optional accessories.
- Foot pedal control
- Link remote
In this article, we will cover all of these items.
What do I need to know about my remote?
These remotes have a wonderful selection of options, including all the basic buttons to engage each option and a screen to monitor what is currently operating. You have your basic selections like left and right arrows and then a motor speed plus and minus button also a propeller on-off button that has an icon of a propeller on it. Some of the advanced features include a button with an N on it which is a compass direction autopilot button when you press that button your motor will hold a straight path.
Another feature of the advanced autopilot is a speed control button. When you press the speed control button, your motor will make its best effort to keep your boat moving at the same speed by adjusting the motor speed for you. I have noticed that this is a feature but jumps around a little bit and force lower fishing doesn’t work as well as I would like.
The spot lock button has the picture of an anchor icon on it. When you press the spot lock button, your motor makes an effort to keep you in one spot, and it can vary but usually stays within 5 feet. I like to use this feature when casting to a shoreline in a slow current area, that’s where this feature excels.
There is another set of buttons which is for recording tracks. You can engage the record feature while you’re on a troll or covering an area and then replay it as many times as you like.
How do I use my depth collar?
The depth collar is a retainer that is attached around the motor shaft and secured with a thumbscrew. The depth collar sets the depth of the motor in the water. Also, the depth collar acts as part of the steering mechanism with a key or tooth that will mesh with the steering box when the motor is deployed.
I roughly set the collar about twelve inches from the head of the motor. I deploy the motor and release the tension on the thumbscrew while holding on to the shaft and slowly lowering it to my preferred depth. You want the center of the motor at about twelve inches depth for normal operating conditions. If the water is rough, you will want to go a little deeper than that if possible.
How do I use my stow and deploy lever?
The stow and deploy lever is a locking lever mechanism designed to hold the motor in one of the two positions. The first thing I will tell you is that when you deploy your motor never let it fall. There is no mechanism on the motor to slow its descent so you should hold on to the motor shaft just above the depth collar and slowly lower it down.
The first step, grab the motor shaft, the second step push the lever in and then down to release the motor, third step slowly slide the motor out and down to lock it in position. The motor should click to tell you that it is firmly in position.
Stowing the motor is almost a repeat of the process in reverse first push in and down on the lever, then pull on the shaft and slide the motor up in a horizontal position until it locks in the Fall away ramp.
I highly recommend some form of motor stabilizer there is a lot of aftermarket options available, I believe one is called a ram, I use a bungee cord attached to a cleat on my boat and clip the other end to the thumb screw on the depth collar. I have had the locking mechanism fail on my motor mount and broke a motor before because of this, and I don’t go anywhere without securing my trolling motor.
We have covered the main parts that you will regularly be using to operate your trolling motor. I recommend that you read through your motor manual for more detailed descriptions of each part, but this will give you a heads-up so you will know what you’re in for and a few user tips in the last few paragraphs.
What are the different parts of my electric trolling motor?
The power motor is located at the bottom of the trolling motor. The power motor is a sealed watertight casing with the composite shaft coming through the top, the electric drive motor inside, and the propeller shaft exiting out the back. The fin or skeg is also part of the casing structure. The power motor is the one part of the motor that is built like a tank and weighs as much as a tank, LOL.
The propeller is attached to the back of the power motor. Does propeller is attached with a nut and retainer and can easily be replaced if damaged by hitting an object. I have never had any major problem with my propeller or have hit any objects that have damaged it I have run it into sand, but for the most part, the motor fin protects the basic depth of the blades.
The motor shaft is a long pole made out of a composite material that is extremely strong and lightweight. The only time that I have ever had a problem was when the deployment mechanism failed and dropped the motor into the water at speed. Rough water or beaching the motor on a sandbar has never caused an issue with the shaft, and the motor has continued to operate just fine.
The Fall away ramps are part of the motor mount, and basically, it’s a sloped area with a moving mechanism for the power motor to set when you pull the motor up it locks the power motor in position. When you deploy the motor, there is a couple of pegs that come off of the steering housing that clip into the retainer of the Fall away ramps holding the motor in position during operation. If the motor did not have a retainer in this area when you started the motor, it would jump up and out of the water, this is an essential part, and the same is true when you go to stow the motor. You need the ramp and lock mechanism to put the motor in a secure position.
The steering housing is a very simple device that functions much like a servo. Inside the steering, housing is an electric motor that is geared so it can easily move a collar with a tooth or key to mesh with the depth collar. The steering housing is one of the parts that I have had to replace. If you think about it, there are only really two moving parts on the motor during normal operation, your power motor and your steering motor. I am not sure what the reason for the failure was, but it did last well out of warranty time. I did the labor myself, and it was an easy replacement with general knowledge of electronics and mechanics.
The motor indicator panel will tell you when the motor is powered, if the autopilot is engaged, and it also has a battery level feature. This one is pretty simple if the green light is on there is power. If the red light is on your motor is on autopilot. When you stow your motor you can push the power level button, and the LEDs will light up to give you a rough idea of your battery status. I recommend if you’re at one light, it’s time to put your motor away for the day to minimize battery damage.
The control box or motorhead is at the very top of the motor. It contains your GPS and your wireless communications, on copilot models are contained in the side panel on the motor mount. If you upgrade an existing motor to an advanced remote system, then you will need to install the new system in the control box. Installing a new control is a relatively easy process and can be done by removing the screws from the bottom and attaching the new controls. Remember to seal your connections properly, and I recommend using dielectric grease to prevent water from corroding those connections.
I added a high-end transducer to my trolling motor and needed a place to attach wires that were as far to the front of my motor as possible. I inserted a bolt through the bottom piece of my control box. I pre-drilled the control box and used some wire clamps to hold my transducer wire in position so would not drift into the propeller.
The motor mount is the base station for all that goes on with your motor. Your motor mount attaches to your boat, and every part of your trolling motor attaches to it. You will not concern yourself with your motor mount daily. You will need to do occasional checks to make sure that your bolts are tight.
What are two Main accessories for my bow mounted trolling motor?
If you are a bass fisherman or fish in any manner with a lot of casting is involved a foot pedal control is a must. You will want to keep your hands as free as possible so you will be able to cast repeatedly without being concerned about adjusting your motor between casts you can push a button with your foot to make motor adjustments. A friend of mine has told me that he doesn’t even think about it anymore and it just comes automatically sometimes not even realizing that he’s adjusted to the boat.
A lot of people who use the foot pedal have a fishing chair in the front of their boat and rest their foot in the pedal all the time. If you rock the pedal forward and back, you can control the steering of the boat. There is a button to the left of your toe to give the motor a momentary boost of power. On the left side in the middle, there is an autopilot button, and a constant on-off button, opposite of those buttons on the right side is a variable speed control. At the base of the unit are redundant Left Right steering buttons and a momentary on button. These redundant controls allow the user to control the motor and whichever way they prefer or deem the most comfortable. My fishing buddy always stands up and only uses the buttons and never puts his foot in the heel-toe device.
My top thing about these motors is all the advanced options that they have, and that’s why I am a fan. Without the Link remote system, this motor would not come to its full potential. I have the link remote, and my system plugged into my depth finder, chart plotter. By connecting my advanced remote with my chart plotter I can run mapped autopilot. I can follow contour lines on my installed maps in my chart plotter. I can also repeat a track on my chart plotter without actually saving a track by simply going to my chart plotter and pressing backtrack. For me this is a must-have and next year when I buy my brand-new motor, I will be buying it with all of this equipment pre-installed and the second generation remote which looks cool.
Check out this article for a budget-friendly bow mount trolling motor.
Summary:
In this post, I have covered all of the main parts of the trolling motor and given some tips on using each one. For more detailed information, you should always consult your motor manual. My motor is a Minn Kota Riptide 80 lb. Terrova series. The Minn Kota Riptide 80 lb. Terrova is a saltwater motor, and I have it fully enabled with all of the features to give me the best fishing experience.
Also, a motor like this can allow you two fish by yourself without any headaches.