A trolling motor is an innovative boating tool for maneuvering a fishing boat through the water without its outboard engine. These devices are available in three models: 12V, 24V, or 36V. The 24V motor is ideal for anglers who are looking for a better fishing experience at a more affordable rate than the 36V motor.
The 24V trolling motor wiring schematic often shows two 12V batteries connected in a series. Connecting two 12V batteries in series provides the 24V power source required to run your motor. The wiring is not complex, and you can wire your motor using the schematics below without a professional.
This article will explain how to wire a 24V trolling motor. I will also discuss many other essential points of 24V trolling motors like power requirement, fishing time, and how to charge your new motor.
How To Wire a 24V Trolling Motor
Wiring a 24 volt motor is a simple task that most people can handle. After attaching your motor to your boat and placing your batteries, your next step will plan out your wiring. Making a wiring schematic is a great place to start.
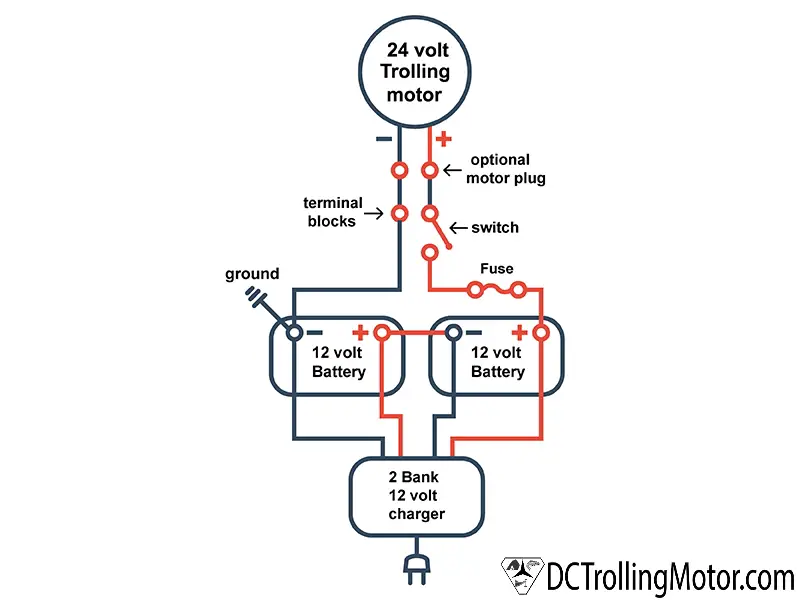
You can wire your trolling motor to your battery in some cases, and your project is done. Most systems will include a multibank battery charger. You will also see notes for where to install a plug, a switch, and a Fuse or breaker in the schematic above.
Start running the wires from the trolling motor and feed them through your boat to your batteries. Before cutting your wires, measure out an extra 12 inches in case you need to trim your wires to remove corrosion in the future.
Strip wires and add terminals to connect to batteries or other post connectors. Make all the connections except the batteries—secure wire with zip ties or other fasteners. Connecting batteries are a bit more detailed, so we detailed this procedure in the next section.
If you have seen anything in this article so far that is confusing you might want to consider hiring a professional. Check out our article Should I install my own electric trolling motor? to help you make the decision.
Check out this article if you need a 12 volt wiring schematic.
How To Setup Batteries For a 24V Trolling Motor
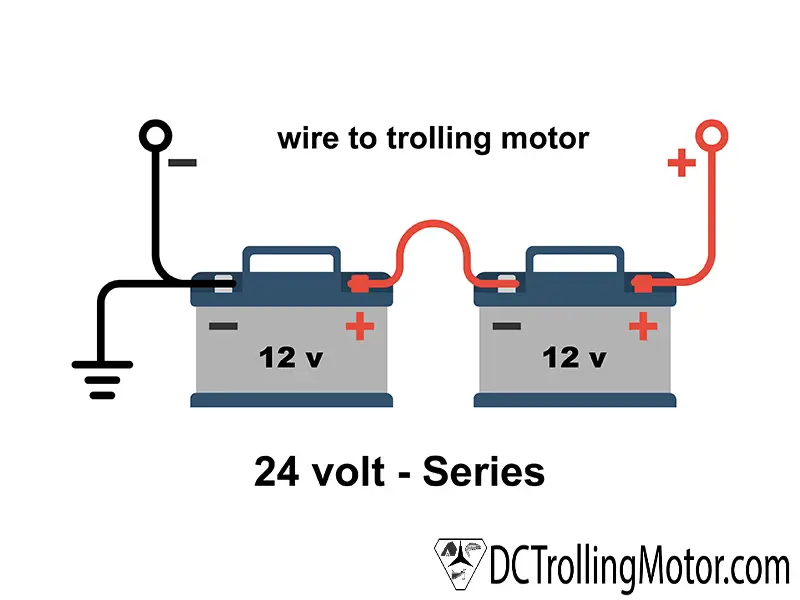
A 24V motor requires two batteries. For the mechanics to function correctly, it is essential that you connect the 12V batteries in a series and not parallel. This method doubles the voltage of your batteries so they can provide the necessary 24V to your motor.
Before wiring your motor, you will need:
- Two deep-cycle 12V batteries
- Connector cable or jumper wire
- Power cable
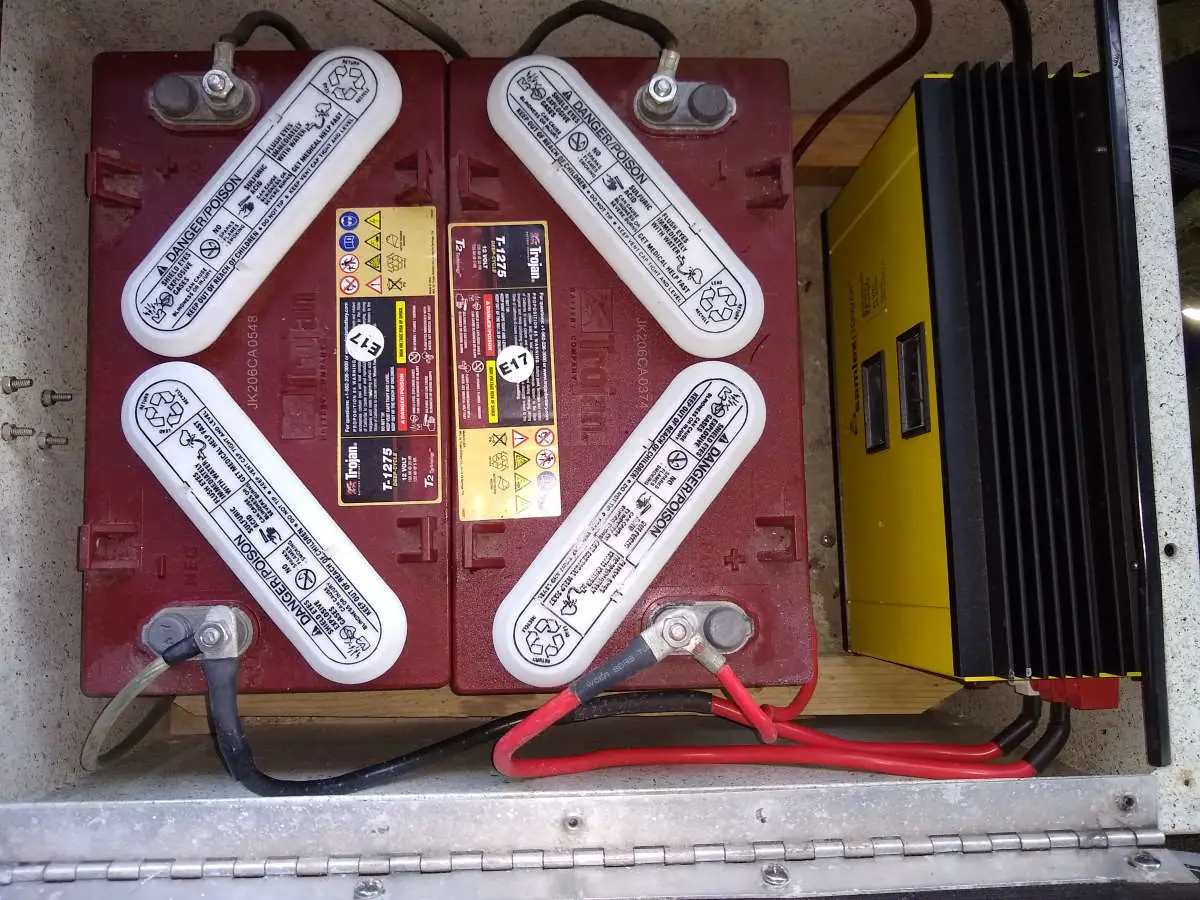
Also, you will want to test the batteries before hooking them up to your motor to ensure that they have an adequate charge. When testing, remember that the negative battery terminals are black while the positive ones are red. Use this information to arrange your meter correctly for the most accurate readings.
Your batteries should have an individual resting voltage of 12.7, and their voltage should be about 25.6 when put into a series. If your readings are below these numbers, consider choosing different batteries.
Once you confirm that the batteries are functional, use the following steps to wire the motor:
- Arrange the batteries side by side. The positive terminal of battery one should be next to the negative terminal of battery two.
- Use the battery connector cable or jumper wire to link the batteries. Join the positive terminal of battery one to the negative terminal of battery two.
- Join the negative trolling motor cable to the negative terminal of battery one.
- Connect the positive side of the trolling motor cable to the positive terminal of battery two.
Alternatively, if you are hooking your batteries up to a circuit breaker, skip step 4 and follow the steps below.
- Connect the positive end of the motor power cable to the output terminal of the circuit breaker.
- Link the output terminal of the circuit breaker to the positive terminal of battery two.
- When ready, reset your circuit breaker to provide power to your trolling motor.
A circuit breaker is an invaluable addition to your trolling motor setup because it helps protect your wiring, motor, and boat from damage. Moreover, a circuit breaker is required for some boats in the United States and by most insurance companies for all boats. Also, you can use a marine-grade fuse if you prefer to, follow the same rating and always carry extra fuses.
How To Choose the Batteries for Your 24V Motor
There are two basic types of batteries that fishers suggest for your trolling motor: AGM batteries and flooded lead-acid batteries. Both of these batteries differ in price and maintenance, so it’s best to choose the battery type you can maintain because they are the cornerstone of your motor’s functionalities.
AGM batteries are fully sealed batteries. The benefits of choosing this battery are:
- Long life span, as the battery lasts about three years
- Enhanced battery life
- Maintenance-free
The biggest drawback of AGM batteries is their cost, as they are significantly more expensive than their lead counterparts and not suitable for small budgets. Still, AGM batteries are the best choice when it comes to performance on the water. However, despite the perks of AGM batteries, most anglers use flooded lead-acid batteries.
Lead-acid wet-cell batteries are the most affordable choice. Besides price, these batteries last one to two years with proper maintenance. But there are some disadvantages, including:
- High-maintenance
- Less battery life
- Prone to spillage
Lithium Batteries are still relatively new to the trolling motor scene. While these batteries don’t have the history that the long-time standards have, they are extremely popular among professional tournament anglers.
- Long-life, 10 years
- 93% available Amp-hours of battery rating
- Low maintenance
There are two main drawbacks to lithium batteries, starting with price. A high amp set of lithium batteries can be priced in the range of $1400 to $2000, depending on assembly location and quality. The second drawback is temperature damage from charging below zero or overheating. Many lithium batteries have BMSs with temperature sensing, but these systems can be hit or miss.
Check out our article Lithium Trolling Motor Batteries: Reviews and everything you need to know
When choosing between these batteries, an AGM model is the apparent winner for your boat. Still, if you are willing to maintain a lead-acid battery, they are suitable for getting the job done.
In either case, your battery must meet these criteria:
- Have at least 100 amps of power
- Group 27 rating or better
Finally, you must not mix battery types. For example, you should not get one 12V AMG battery and combine it with a wet-cell battery. Crossing batteries will likely damage the stronger battery and should be avoided.
How To Stay Safe When Wiring a 24V Motor?
Generally, wiring a trolling motor is a safe task, but there are some things you can do to prevent accidents.
Remove any jewelry when working on the batteries, which prevents the batteries from discharging electricity through these items and into your body, eliminating the shock risk. Also, consider wearing thick clothing to guard against the corrosive liquids found in the battery. Finally, you want to wear eye protection.
What Size Wire Do You Need for a 24V Trolling Motor?
You will need an 8-gauge wire for a 24V motor system. However, the proper size of your wire depends on the length of your system. For example, a 20 feet (6.09 meters) system or longer can function with a 6-gauge wire. Similarly, more extended systems usually need a lower gauge wire.
The manufacturers will dictate which wire is best for your system in its user manual. However, in the absence of a recommendation, stick to the standard sizing for the length of your system.
How Long Does a 24V Trolling Motor Last on the Water?
24V multi-battery systems will last about 2 hours when used at full power. But for most anglers, maximum power is not necessary. If you use the motor at half its power, you can expect four hours of battery life or more.
Notably, each trolling motor is different, so if you need an exact number, divide 50% of the battery’s amp-hour rating by its amperage draw. You can find the draw number on the product label.
A significant feature of 24V motors is that they have a lower amperage draw resulting in more prolonged usage.
How Do You Charge a 24V Battery System?
Despite your choice of battery, it will need charging before and during your fishing trip. Charging the battery requires you to connect your preferred charger’s positive and negative heads to the available terminals in your series.
The most straightforward method for charging your batteries while on the lake is to use a portable charger. Alternatively, anglers can have an alternator charger connected to their main motor. Using solar panels is another viable option of charging the battery while out to sea, which would sit on the top of your boat and provide energy for the trolling system.
Alternatively, wind-powered generators on the market are much easier to install than solar panels and are just as efficient.
Afterward, the charger must be connected to an onboard power supply or wall mount while on land.
Final Thoughts
A wiring schematic is a great way to start when installing your 24 volt trolling motor. You can map out all your system components and make a checklist, so no detail is missed.
With suitable marine-grade components, an amateur can achieve great results so you can have a great fishing trip.
Check out our article 9 Reasons We Prefer 24 Volt Trolling Motors