
If you decide to go with a larger 36-volt trolling motor for all your fishing and boating needs, you will need a special battery and wire setup to power that beast. Small and medium trolling motors may be able to rely on one single 12-volt marine battery, but your 36-volt trolling motor will need three separate 12-volt marine batteries.
So, how do you properly wire a 36-volt trolling motor, and what accessories do you need to make this multi-battery and motor setup a reality? It is not too difficult to assemble yourself. Let us take a look at how to wire a 36-volt trolling motor and what you should consider before purchasing your 36-volt trolling motor and kit.
Note: most links in this article are Amazon.com Affiliate links, see Affiliate Disclosure, thank you.
What Should I Consider When Wiring a 36-Volt Trolling Motor?
Before we get started, there are some topics to consider when wiring a 36-volt trolling motor. Each of these topics will decide what is best and safest for your system.
- Wire gauge: Wire gauge is measured using a unit called AWG (American Wire Gauge). The smaller the number, the larger the wires are. The wire gauge is determined by the motor thrust rating, the max amp draw, and the wire length. The higher the thrust, the longer the wire, the smaller the AWG number you need.
- Motor amps: A motor’s thrust again determines how much power draw your motor needs to operate, which then determines the battery load required.
- Breakers/Fuses: Breakers are designed to trip at a certain amp level, breaking the circuit and preventing the motor from overloading. The circuit breaker should be sized to be no more than ten amps over your motors max draw and under your wire gauge rating.
- Battery connectors: Designed to make wiring your 36-volt battery rig simple and to keep the wires organized.
- Battery chargers: You can choose from an onboard charging system or a portable charging system where you can hook up your batteries to charge when you are onshore.
- Saltwater vs. Freshwater: Saltwater can corrode the material of a trolling motor if it is not specifically designed to withstand saltwater. Determine if you will only fish in freshwater, saltwater, or both, and pick your trolling motor accordingly.
- Wire extensions: Measure the distance from your trolling motor to your battery setup. Most trolling motors only come with power leads that are 3-5 feet in length. You may need wire extensions to reach your battery setup. Consult your motor manufacture’s guide or ask a professional what wire gauge you will need depending on the length and your motor’s thrust.
Check out our article How to Connect a Trolling Motor to a Battery for general step-by-step instructions for 12 volt systems.
How to Wire a 36-Volt Trolling Motor
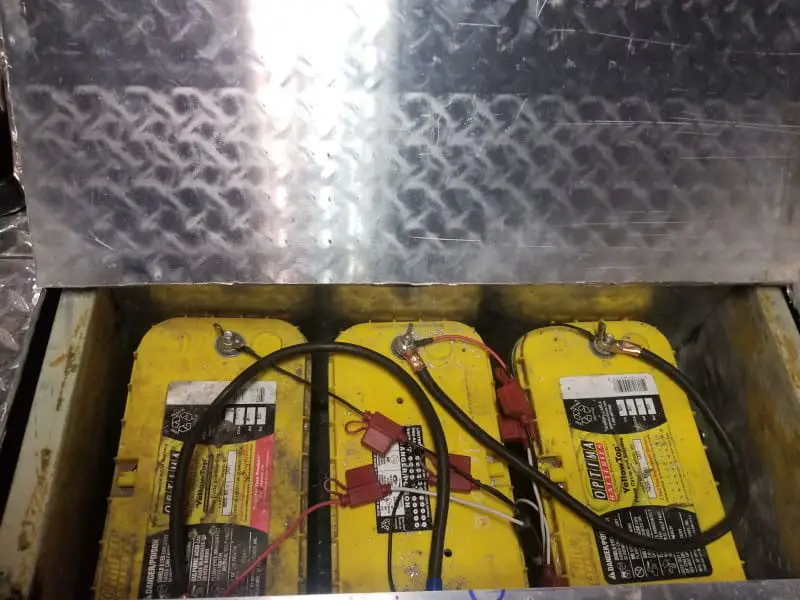
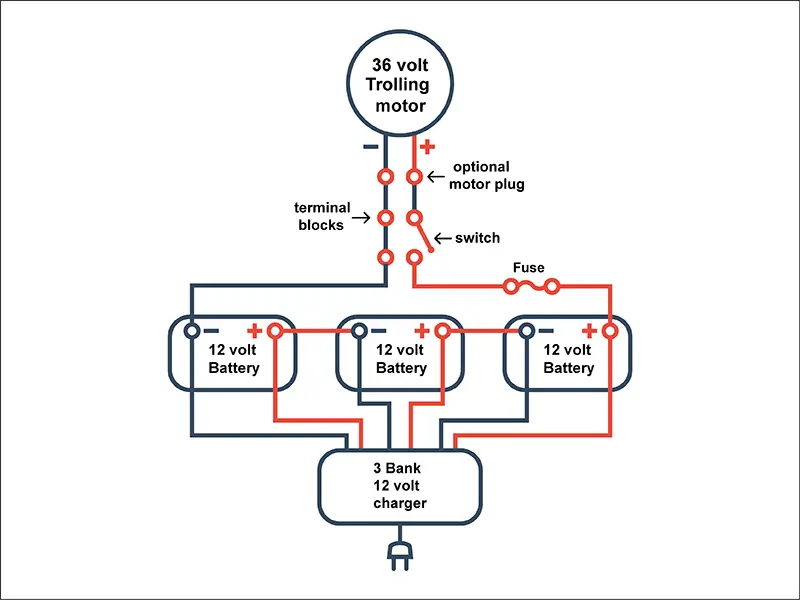
A 36-volt trolling motor needs three separate 12-volt marine batteries to function. To achieve the required 36 volts, three batteries are connected in series, increasing the voltage.
Be sure all your batteries are properly charged with your onboard marine battery charger before hitting the water or have a quality alternator charger setup. Alternator chargers can pull power from your starting battery, which recharges from running your boat’s motor, or you can explore solar power.
Ok, let us take a look at how to wire your 36-volt trolling motor.
- Step 1: Install your trolling motor on your boat in the exact location you will be using the trolling motor and foot pedal. It is up to you if you’d like a stern or the bow mount trolling motor for your boat. However, be sure it is as close as possible to the centerline of your boat.
- Step 2: Setup placement for three 12-volt deep cycle batteries that are as close as possible to your trolling motor that is completely protected from outside water and rain. If your batteries need to be further away from your trolling motor, you can add wire extensions.
- Step 3: Be sure your trolling motor is in the off position.
- Step 4: Connect the first connector cable to the positive (+) terminal of battery number one and the negative (-) terminal of battery number two.
- Step 5: Connect a second connector cable from the positive (+) terminal of battery number two and to the negative (-) terminal of battery number three.
- Step 6: Connect a third connector cable from the positive (+) terminal of battery number three to the input terminal of a circuit breaker.
- Step 7: Connect a fourth connector cable from the output terminal on the circuit breaker to the positive (+) red lead on the motor.
- Step 8: Connect a fifth connector cable from the negative (-) black lead on the motor to the negative (-) terminal on battery number one.
Adding an Onboard Charger to your 36-volt Trolling Motor
If you have an onboard charger to add to this 36-volt setup, take the positive and negative leads from the charger and hook them up to each battery accordingly. There should be four connection cables on your onboard charger for a 36-volt setup. Three cables are for your trolling motor batteries, while the fourth cable is for you’re A/C power.
The A/C cable should be plugged in at all times while the boat is not in use. Also, be sure you select the proper battery type on your onboard charger to make sure your batteries are charged properly and to maintain the longevity of your battery’s life.
Click here for our Review of the top 3 bank marine battery charger
It is recommended to connect your main (starting) battery to a charging system for proper maintenance. This will extend your battery’s service life and in the end, save you money. You can connect all your batteries with one 4 bank smart charger that has the ability to charge different types of batteries.
Adding an Alternator Charger to your 36-volt Trolling Motor
A nice addition to any electric trolling motor system is an Alternator charger like the MK-3. The MK-3 has five cable leads three connect to each of the three batteries. Another lead connects to the main motor battery.
The final lead is a connection to the ignition switch to energize, turn on your MK-3 charger. It is not likely to recharge your battery system with an alternator charger, but it can add an hour to your fishing day.
Click here for our article about Boat DC Alternator Chargers
How to install a 36-volt Wire Connection Kit?
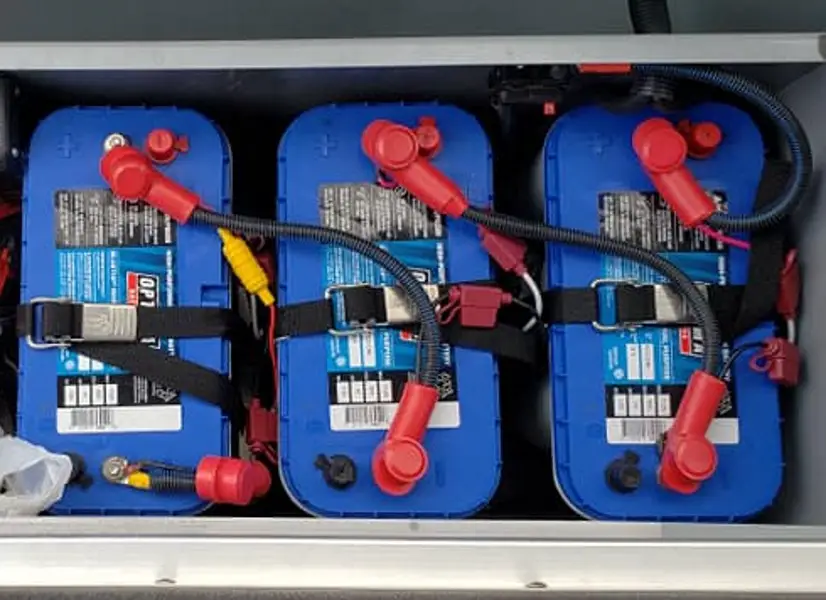
This is the basic breakdown of how to wire a 36-volt trolling motor with a kit. You can make the entire process easier by adding the use of the Connect-Ease RCE36VBCHK Easy 36-Volt Trolling Motor Connections Kit.

The Connect-Ease 36-volt easy wire connection kit is worth every penny. The concept is the same when hooking up the proper positive terminals to the negative terminals; however, the connection kit makes the process fool-proof.
- Step 1: Take one of the easy connect wire harnesses, find the base which has the two wires coming out of it, one red and one black. Then hook up the red jumper wire to the positive (+) terminal and the black jumper wire to the negative (-) terminal of the battery.
- Step 2: Repeat step one with the other two wire-harness bases and the other two batteries.
- Step 3: Take the main wiring harness of the easy connects and plug them into the three bases that are already connected to each battery.
- Step 4: Connect the black wire from the main wiring harness to the negative (-) black lead terminal on your trolling motor.
- Step 5: Connect the red wire from the main wiring harness to the input terminal of a circuit breaker.
- Step 6: Finally, connect the positive (+) red lead on your trolling motor to the output terminal of a circuit breaker. Your setup is complete!
If you have an onboard charger, look at each easy connect attached to each of your batteries. The top piece of the easy connect will have two smaller red and black wires coming from them. Those are there for you to connect with the leads from your onboard charging unit.
If your charger leads have ring terminals, fuses, and diodes, we recommend connecting them directly to the battery terminals.
Final note: you can use this kit with a 4 bank onboard charger. Connect one lead to your main battery and connect the remaining three leads to the Connect-Ease. You will have all the benefits of simple wiring and the ability to remove your trolling motor batteries without a headache.
Should I use a 36-Volt Trolling Motor Kit?
It seems nowadays it is more common for trolling motors to need larger voltage and battery setups to support the power they need. You must understand how to wire a 36-volt trolling motor correctly and that you consider the factors we discussed above before attempting to set up a 36-volt trolling motor on your own.
Secondly, the cost is always a consideration with any project. We added up all the parts you would need to wire your 36-volt system, and if you include connector plugs, you will be in the same price range.
If done incorrectly, you may cause damage to your batteries, the onboard charger, and/or the motor, costing you thousands more in the long run. Also, improper battery installation can cause a battery to explode.
That is why we suggest taking some of the risks out of the equation by using the Connect-Ease RCE36VBCHK Easy 36-Volt Trolling Motor Connections Kit. This 36-volt trolling motor kit will make installation one-hundred times easier and safer.
So, be ultra-careful, do your homework, and ask a professional if you are at all unsure. Happy fishing!
The article you just read was about 36-volt wiring but unless you have an oversize boat we think you should read our article – 9 Reasons We Prefer 24 Volt Trolling Motors